Manage Groups within Preferences
Group Management
An Introduction to Group Management
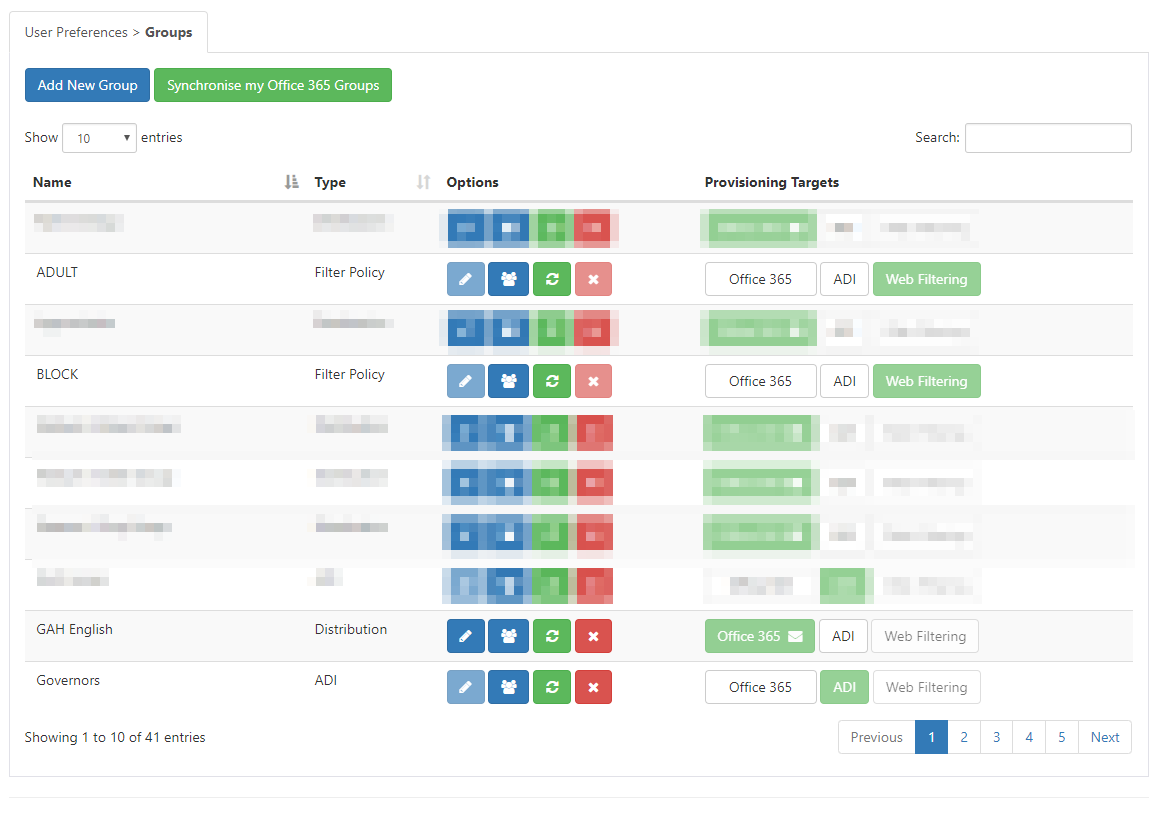
The new Group Management page consolidates all of the different types of groups allowing you to manage groups from a single location and share groups across multiple services
SIMS ID supports groups that are extracted from the MIS or created manually. These groups are identified as follows:
- ADI - used to provision local Active Directory Accounts
- MIS - Groups managed in the MIS such as class, house and registration groups
- Web Filtering - groups used for managing web filtering.
- Office 365 Groups - used for managing access to Office 365 features like SharePoint and/or email distribution lists
- Google groups - used for managing access to Office 365 features like SharePoint and/or email distribution lists
Within the Group Management function, inside Preferences, a Site Administrator has access to the following functions:
- Create New Groups
- Modify Existing Group Memberships (where this is a valid function)
- Remove Groups from Services
- Enable Groups for Mail Services (where this is a valid function)
Group Management
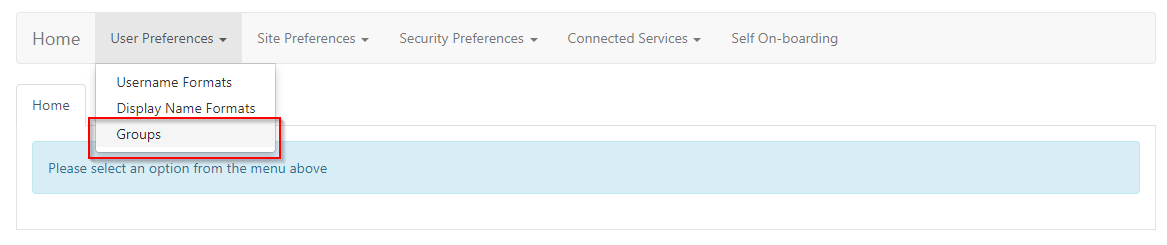
To access Office 365 Licences Management Select the Preferences tool from the SIMS ID launch Pad.

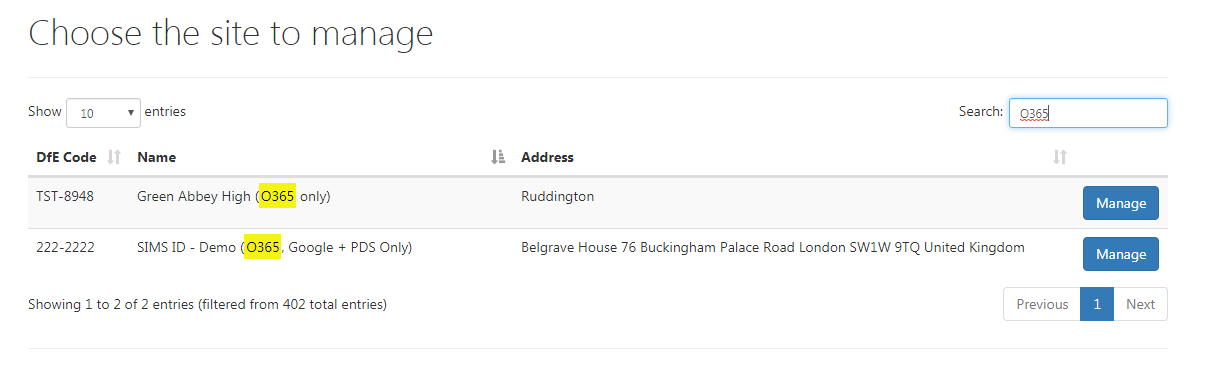
If you only have access to one site, the following step is not necessary
Then choose the site you wish to manage from the list of sites presented. You can use the search tool and column ordering functions to assist your search
Now click on the User Preferences drop down and then click on the Groups link
Creating a Group Manually
Sites will only have the ability to create groups and allocate them to the service that they have access to. For example, a site that has does not have access to the local AD provisioning service will not have the ADI Group available.
In order to create any type of group for your site manually, you will need to click on the Add New Group button above the group table
Once the button has been clicked the group creation wizard opens within the page
Enter a group name into the name text box, this must be unique, if the name clashes with any existing groups a message will be shown and the group will need to have a unique name
Select the any of the available options frot eh site from the Group Type drop-down menu
Click on the Next button in order to be taken to the members and details part of the group creation wizard. Different group types require different initial information.
ADI groups only require members to be added at creation
Google groups will require a description of the group and a valid email address for the group to be created
Office 365 groups will require a description of the group and the Site Administrator should choose whether to enable the group for email which will then prompt for a valid email address for the group to be entered
To add members to the group click on the Members button to open the member's selection window
Once within the member's window find the users you wish to add and click on the Plus button within their row
If you wish to check which members have been added so far click on the Show Members button to be shown a list of all the users selected so far once happy with the users that are going to be added to the ADI group click on the Save button where a secondary message will be shown to all the users that are going to be added to the group which will require additional confirmation
Once the members have been selected for the group click on the Next button within the group creation wizard to be taken to the final screen for group creation that is an overview of the new group's details
Once you are happy with these details to click on the Save button and the group will be created
Please note that depending on the amount of groups that are being created or the type of group you are created at that time it will take some time for the new group to complete its ENTIRE creation process from end to end
Editing Groups
Clicking on the 'Edit' button  next to any editable group within the group table will then open a wizard and guide the user through the changes that can be made.
Special notes for editing an ADI Group
ADI groups are not editable as they only require a name and this value cannot be edited after a group has been created.
Editting a Office 365 Group
For office 365 groups the user is able to edit the following details:
- Description value of the group
- Enable or Disable the group to have email access
- The email address of the group
Editing a Google Group
For Google groups the user is able to edit the following details:
- Description value of the group
- The email address of the group
Editing MIS Groups
MIS groups cannot be edited within SIMS ID these can only be viewed within SIMS ID all the data for these groups is being pulled from SIMS.
Updating Members of a Group
If you wish to add new users or remove users from a group, click on the member's button  within the group table, the member selection window will open.
To remove existing members of the group click on the Remove button  on the row(s) you wish to remove.
To add new members to the group click on the Add Members button and then click on the Plus button next to the chosen member
Once you have made the updates click on the SAVE button, this will then detail the changes, clciking OK will save them.
Deleting a Group
In order to remove a group from SIMS ID click on the Delete button on the row for the chosen group.
A second confirmation screen will appear within the page and you can confirm the deletion of the group.
Please Note: MIS and Web filtering groups are not eligible for deletion
Add other settings to an Existing Group
Certain groups within SIMS ID are able to be enabled for other services.In order to turn on a service for an existing group simply click on the pill within the provisioning target column of that group.
For example, to use an ADI group in Office 365:
- find the group on the group's table
- click on the Office 365 pill within the provisioning target column
This process can be reversed for disabling that service for a group.
Please Note: You cannot disable a group from its root service
Managing Web Filtering Policies for Groups
Certain groups like MIS Groups are able to be added to web filtering policies
In order to add a group to a web filtering policy click on the Web filtering pill

This will then open a popup that will allow you to select the policy you wish the users of the chosen group to be added too

Select a policy and click on the OK button which will then add all of the members of that group to that web filtering policy
Button Key
The root service can be identifed by 
Configured extra services 
Not confgiured other services 
Other service not available for group type 
Troubleshooting Office 365 / Google Groups.
Sync groups that exist in Office 365 but do not exisit in SIMS ID.
Where groups and members have been created in Office 365 through the Office 365 Amdinistration portal they will not appear in SIMS ID and therefore will not be updated when changes are made in SIMS or SIMS ID.
To ensure that SIMS ID reflects the groups within Office 365 you can initiate a Group Sync by clicking on the  button.
Re-sync groups from SIMS ID to Office 365 / Google.
Sometimes you may want to force a group sync from SIMS ID to Office 365 and/or Google. You may want to do this if your Office 365 / Google distribution group does not match the group within SIMS ID. To action this please click the
re-sync group icon next to the group in question.
