Office 365 Self Onboarding
School in this scenario will periodically need to repeat the user matching process and SHOULD NOT complete the Federation Step at the end of the porcess
- 1. Office 365
- 2. Before you can Self Onboard
- 3. The Office 365 Self Onboarding Process
- 4. Accessing the Tile Store
- 5. Sign-On Federating your Office 365 tenancy for Single Sign On from SIMS ID.
- 6. Next Steps
Office 365
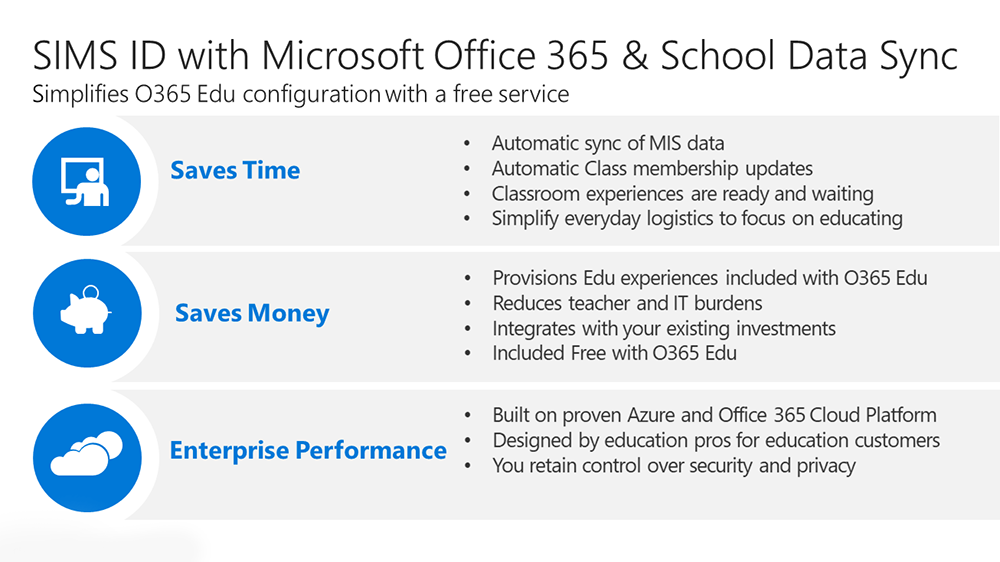
Save time and be successful with your free Office 365 for education subscription with auto-provisioning of users, classes and groups from SIMS. Office 365 and SIMS ID is built for teachers and students, full of powerful tools, and accessible from your favourite devices.
- Organize in one place - Capture and organize all your class materials in OneNote, your digital notebook.
- Engage in new ways - Create interactive lessons and spark student creativity using Sway.
- Individualize learning - Bring students together in a collaborative space or giving them individual support in private notebooks within Class Notebook.
- Collaborate without boundaries
- Create, share and even collaborate real-time with Word, Excel, PowerPoint and OneNote—without worrying about lost formatting.
- Let SIMS ID take the strain - removing the need to actively manage your Office 365 tenancy
- Built with flexibility in mind - you retain control of your Office 365 tenancy allowing you the flexibility you need while SIMS ID provides the automated tools to make life easier
If you need more information on Office 365 view the Office 365 for Education options page. Where you can find out more and sign up for a Free Education A1 tenancy.
Before you can Self Onboard
Before starting a self-onboarding you will need:
- a SIMS ID site that has been configured with your desired username formats, these should match the username format in your Office 365 tenancy.
- if you do not have a site or have not had the username format set please contact your support unit.
- An active Office 365 tenancy
- This should be education verified by Microsoft
- A domain name should be associated with the tenancy
- A set of Tenancy Service Account credentials
The Office 365 Self Onboarding Process
The process is designed to allow you to come back to the process over a period of time, picking up where you left off. You do not have to complete the whole process in one session.
Getting started
Like all application installs this task is initiated from inside the Tile Application Store.
For full information on using the Application Tile Store please see Using the Tile Store an Overview
Accessing the Tile Store
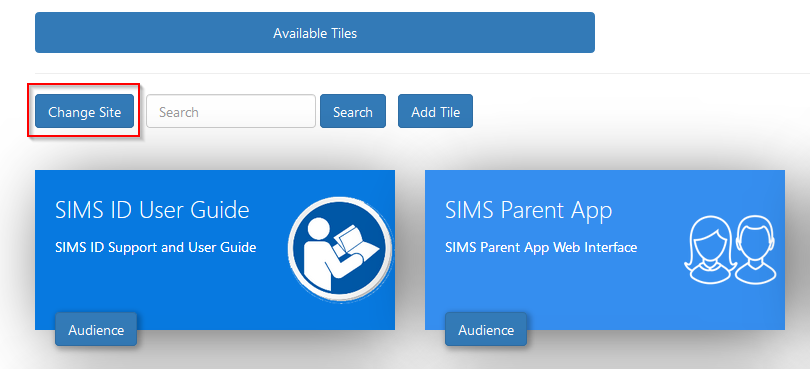
Login to SIMS ID https://id.sims.co.uk as a Local Site Administrator,
The Tile Store is accessible via the Tile Store tile on the Launcher Page of SIMS ID. Only admin users will have access to this tile.

If you have admin access to more than one site, when you access the tile store you will be taken to your primary sites Tile store first, if you want to change sites click on the "Change Site" button at the top or the page and a list of available sites will open within the page allowing you to select the site you wish to manage.
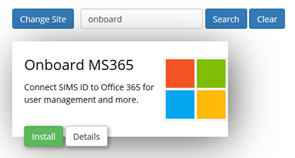
Finding the 'Onboard MS365' application
A search facility is available on the Tile Store screen to help quickly locate tiles you are looking for. Search for 'Onboard MS365'
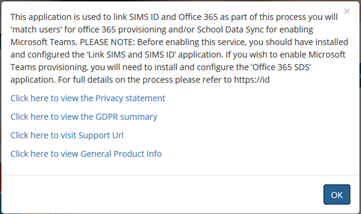
Checking the application
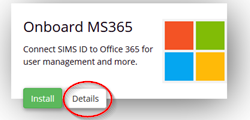
On the Application, there is a Details button. Clicking this button will provide you with information about the application. Included are links to the applications:
- Privacy Statement
- GDPR data transfer summary
Support Page
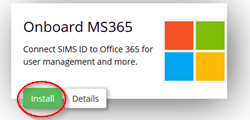
Installing the Onboard MS365 Application
To install an application, click on the green Install Button on the tile.
The next screen will inform you that you will agree a GDPR statement later in the process.
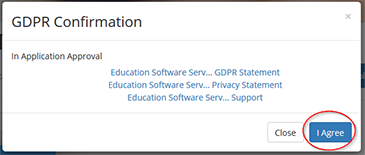
Click I agree.
Once installed the Onboard MS365 application becomes available on the *Available Tiles screen. You will be taken to this screen.
Configuring the Link Onboard MS365 application
To configure the application, click on the 'Onboard MS365' application tile.
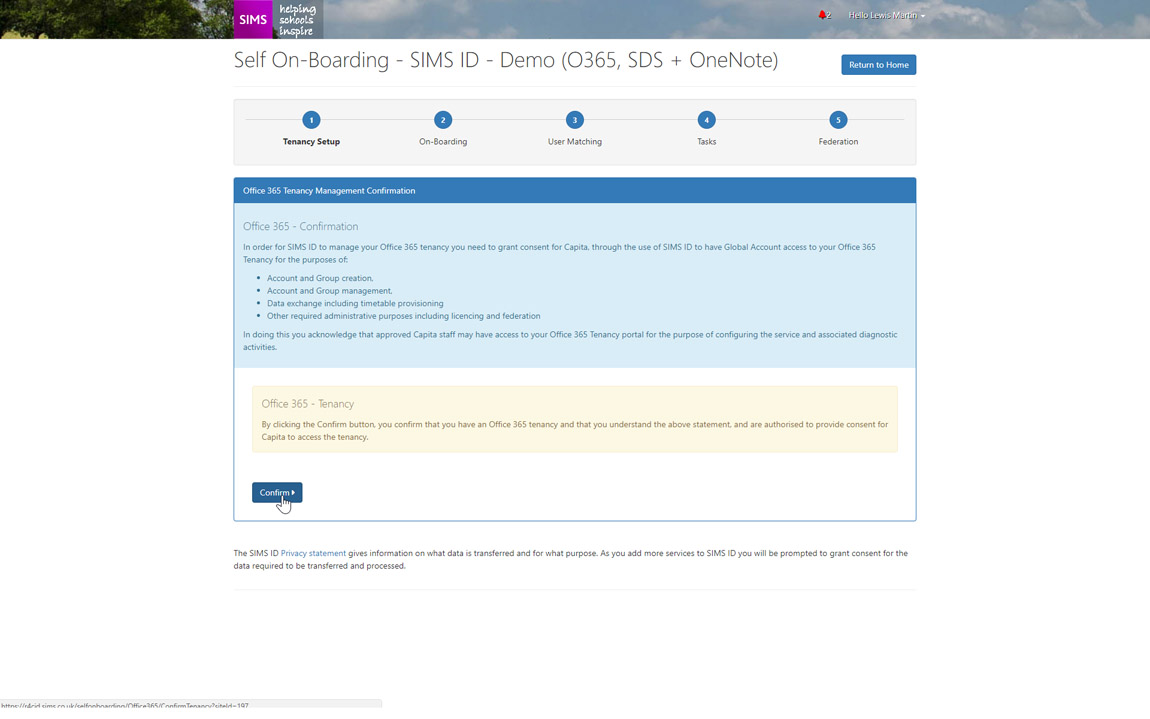
Granting access to your Office 365 Tenancy
The first screen details what actions you will be allowing SIMS ID to take on your behalf, it also confirms that you understand you are passing Account Credentials to ESS for the purpose of administering elements of your Office 365 tenancy. If you are happy with the agreement you should click confirm.
The next screen allows you to populate information about your Office 365 tenancy including the service account credentials.
The account should be in the format ending onmicrosoft.com The accounts password should be set to not expire The account should not have Multifactor Authentication enabled unless you are confident in setting up an application password)
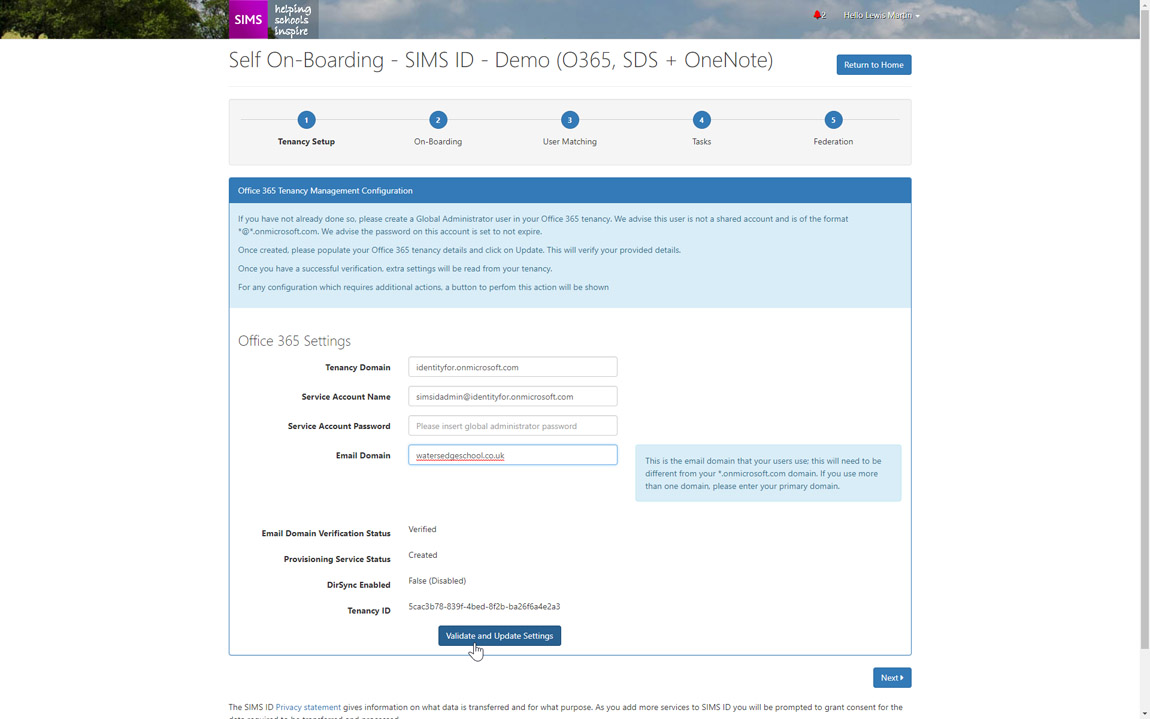
When you have entered the necessary information you should click Validate and Update Settings this will check the details you have entered are correct.
If the system detects that the tenancy is not education verified it will alert you. You should contact Microsoft to arrange this otherwise you may be subject to charges that are not necessary.
If the system discovers that a provisioning account is not available it will alert you and provide a button to create one.
You can keep validating the information after each change.
Once all elements are OK you will be able to move on by clicking the next button#
Setting up SIMS to provide SIMS ID with your user data
SIMS ID extracts data from SIMS using the People Service and associated Group Services. The next set of screens set this up. You may have already set some elements of this up if you use other SIMS Online services.
The first screen enables the People Service.
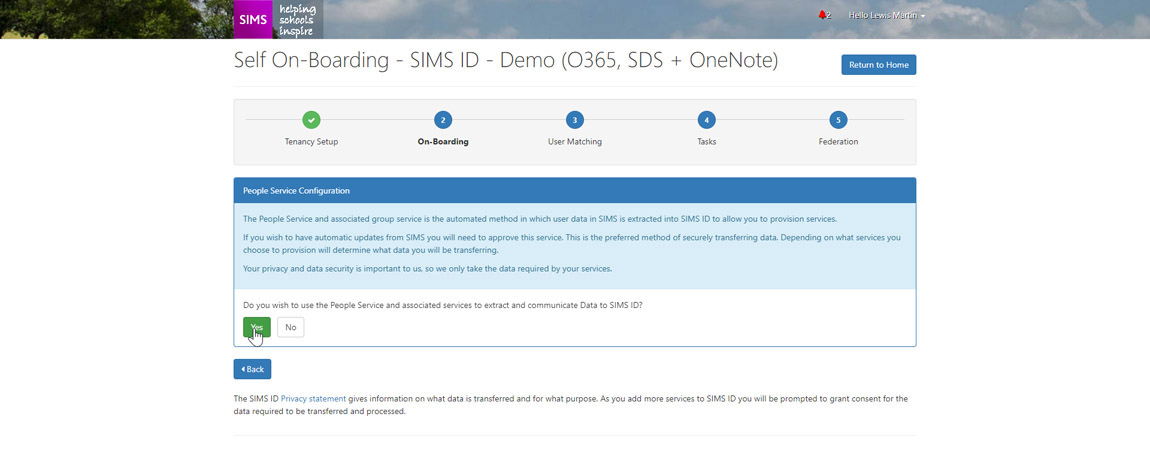
You should read the statement and the select Yes to confirm you wish to use the service and click next
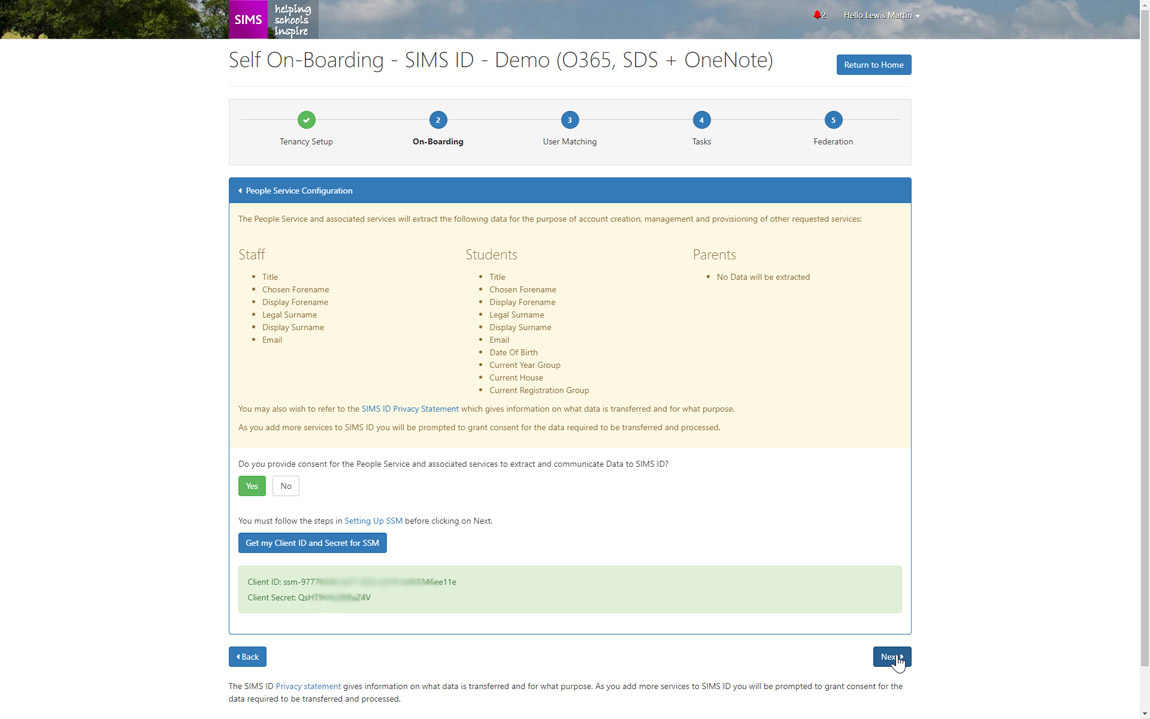
The next screen provides information on what data will be transferred to SIMS ID.
![]()
ESS takes great efforts to be transparent about what data is used and for what purpose. This is not just about complying with GDPR but also because we know how valuable and sensitive your data is. You may want to view our Privacy Statement a link can be found at the bottom of every page in the Self-Onboarding process or on our Support Site
If you consent to the data transfer please click Yes
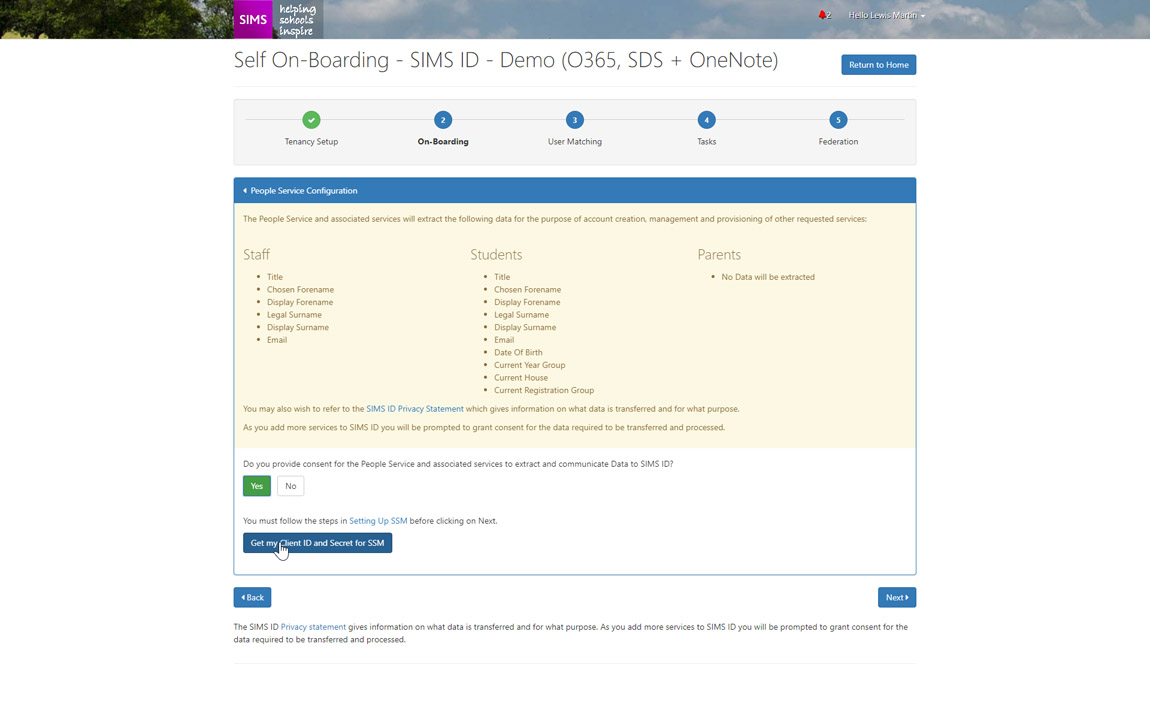
The next step is to set up the relevant service is the SIMS System Manager module - A explaining how to do this is provided on the screen and is also available here:setting up SSM
You may have already done this. If not you will require a Key and Secret This is provided by clicking the Get my Client ID and Secret for SSM Button
Once you have set up SSM you should click next
This will initiate a re-sync or an initial sync of data between SIMS and SIMS ID. If this is an initial Sync there could be a delay of up to sixty minutes.
User Matching
When the SSM Sync has completed (remember you can abandon the process and pick up at this point sometime later) you will be presented with the User Matching service.
This service is used to align records in SIMS ID with those in Office 365.
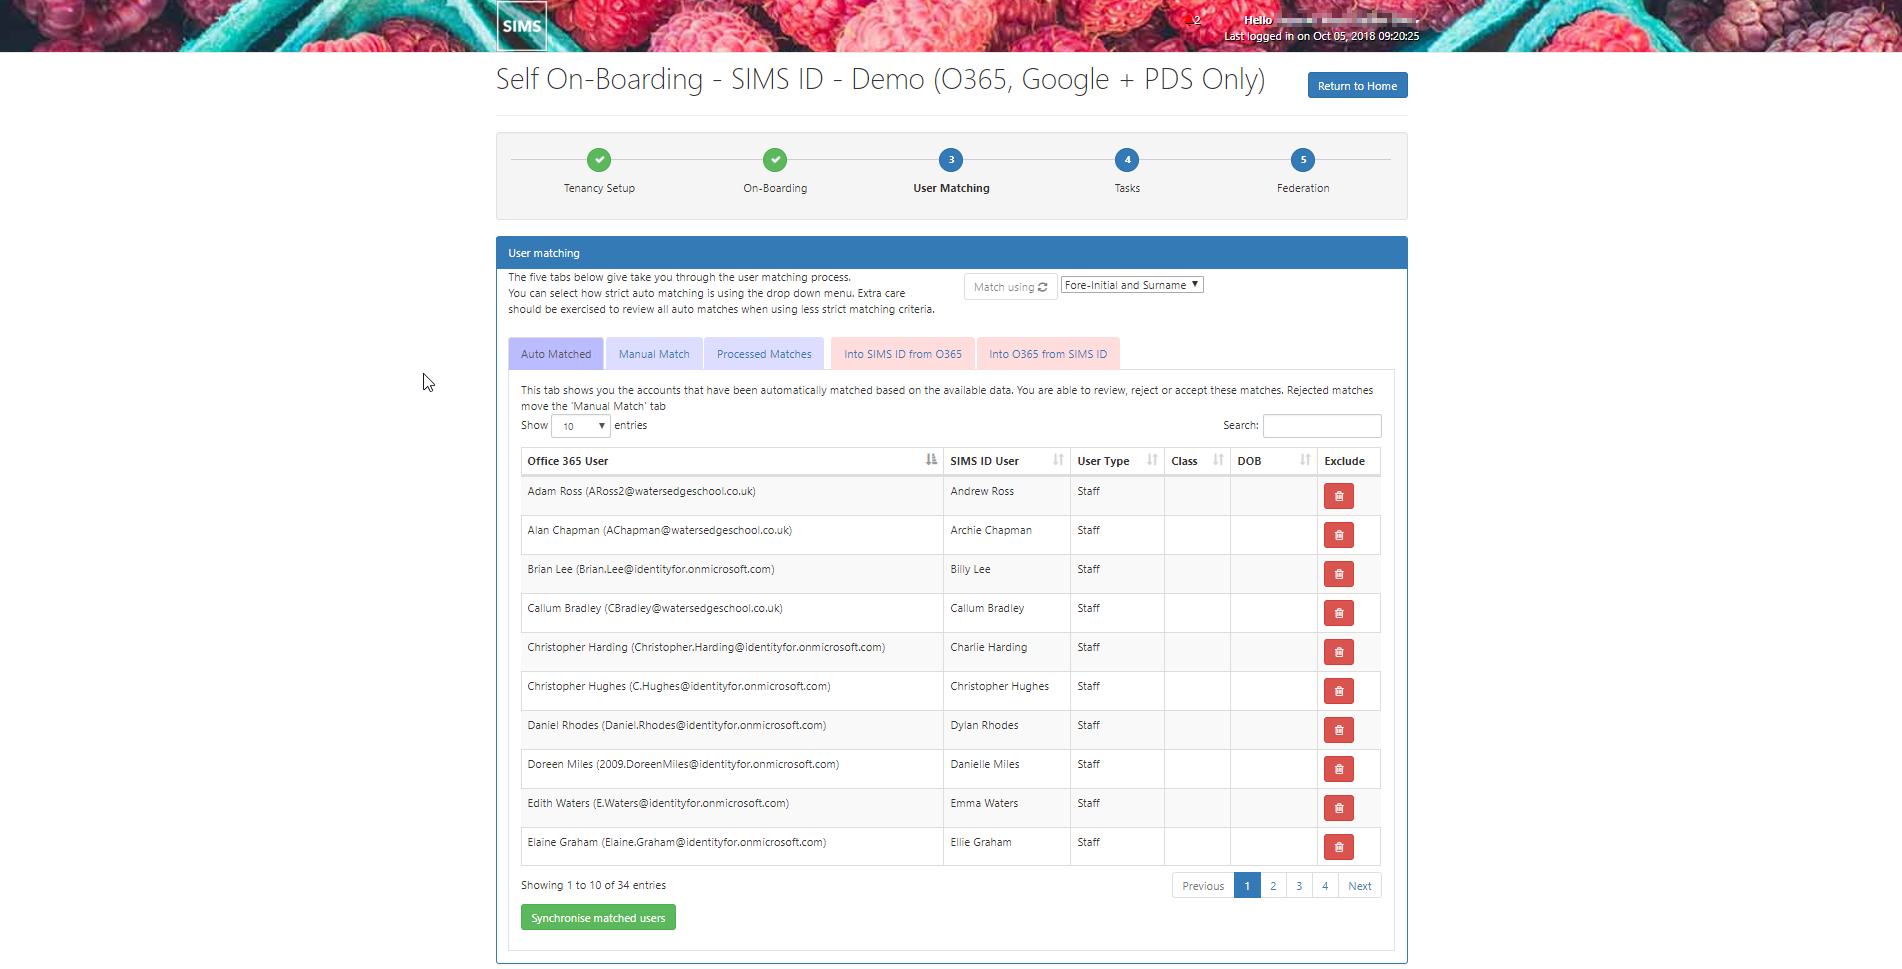
The service comprises of working through five tabs.
There are two types of filter you are able to select from to match users and they are:
- forename and surname
- forename initial and surname
This matching will affect the users brought back in auto-matching, manual matching and processed matches
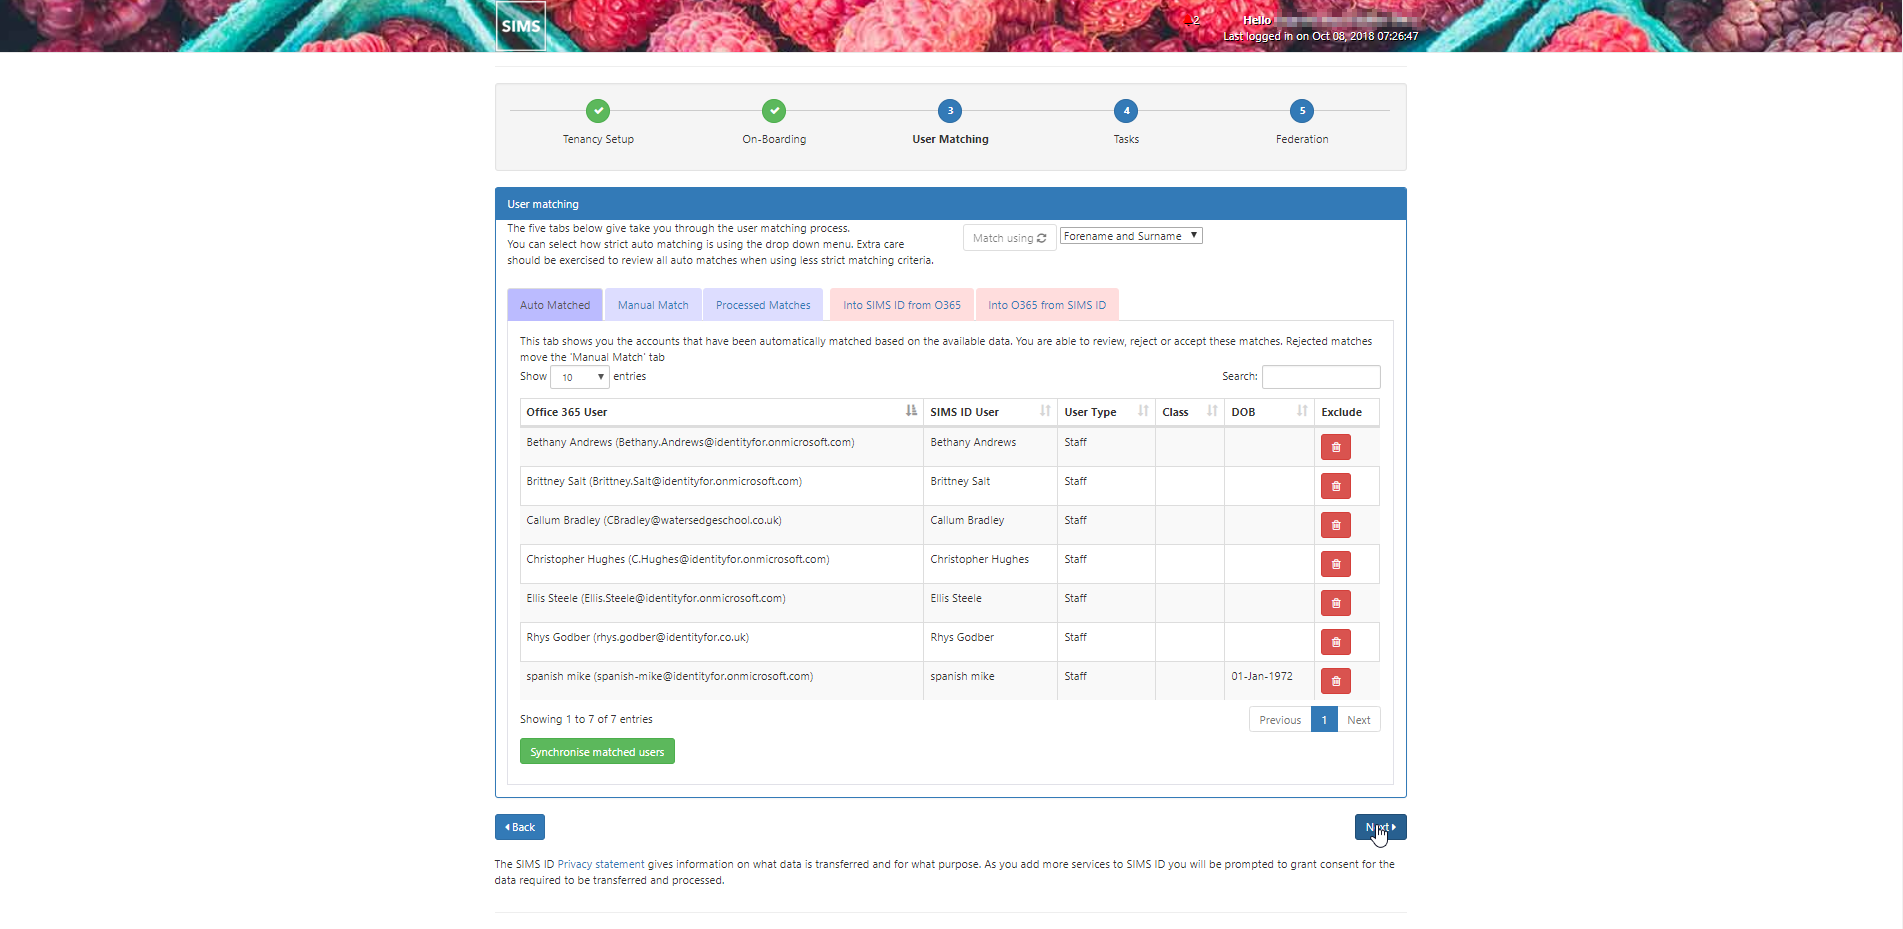
Automatic matches
The first tab displays all the Automatic Matches the system has identified.
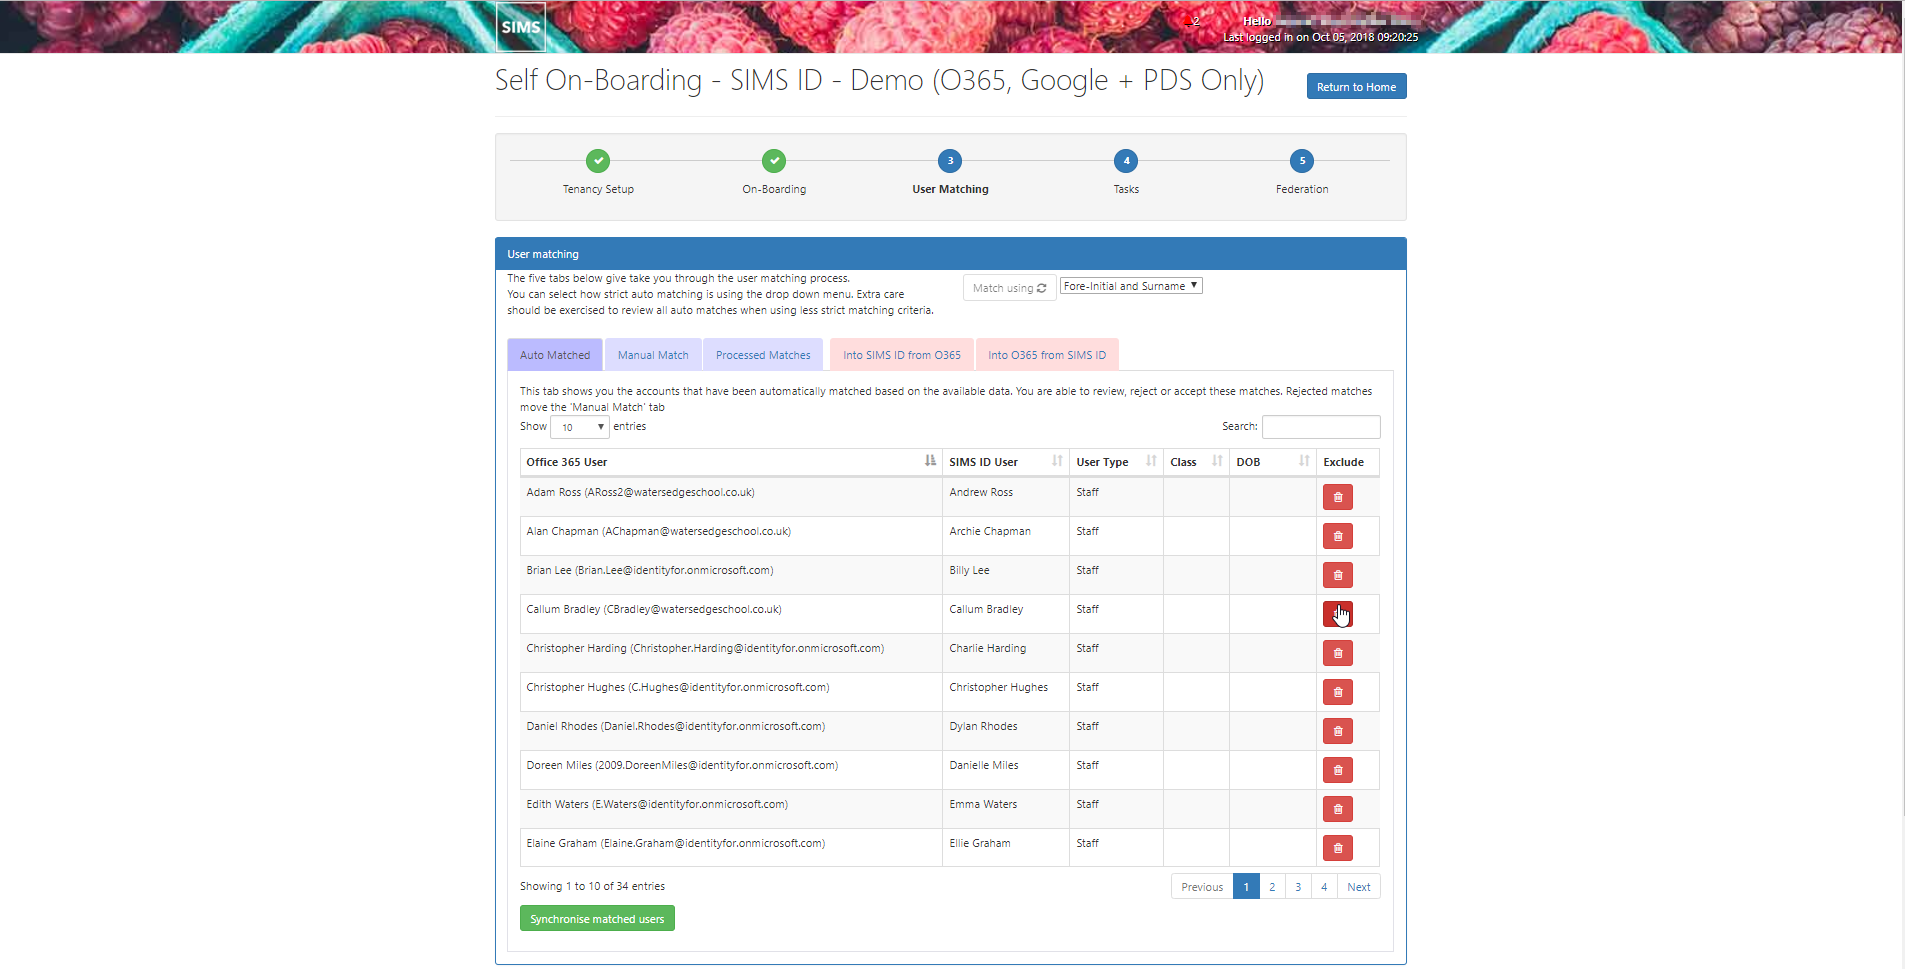
Please review these, discarding any incorrect matches or suspect matches by clicking on the trash can icon next to the name.
These accounts will move the manual matching process.
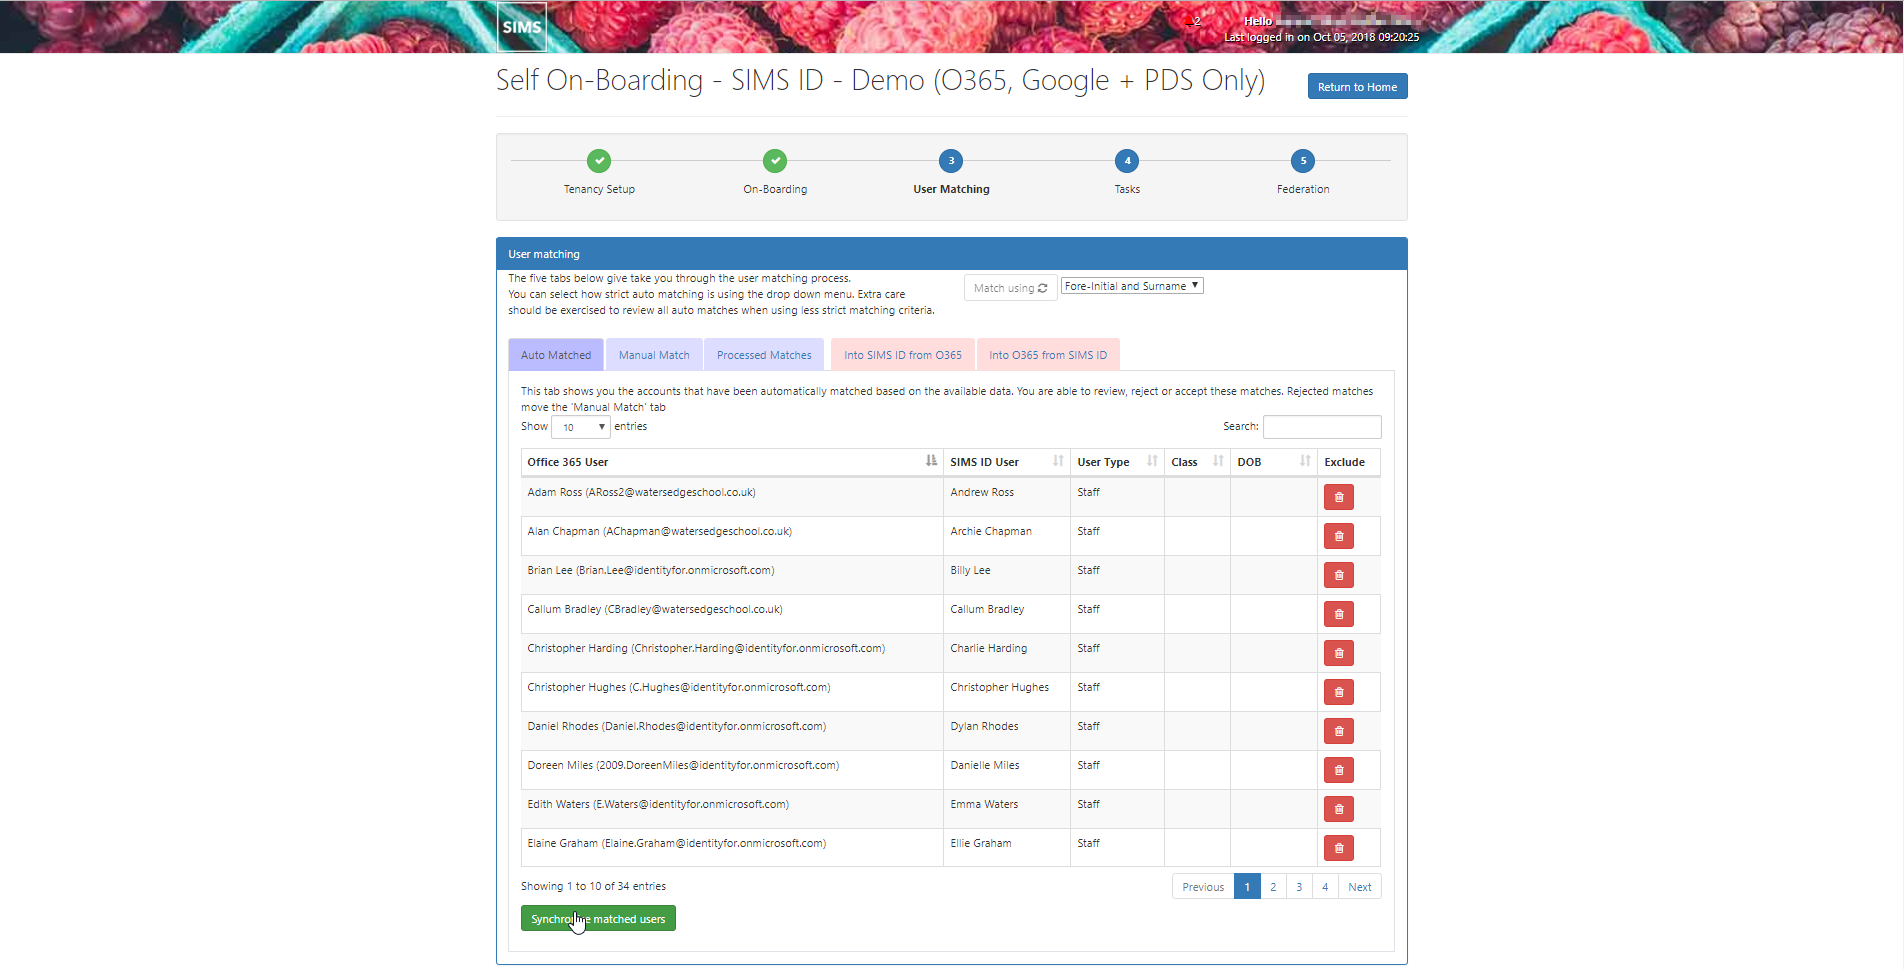
When you have reviewed the Automatic Matches please click the green Synchronise matched users button.
Please wait while these users details are written to SIMS ID and Office 365.
The screen will reload the data from SIMS ID and Office 365 when complete.
You are now ready to move to the next tab Manual Match

Manual Matching of users
The Manual Match tab provides you with a list of users from Office 365 on the left-hand SIDE of the page and a list of user data from SIMS ID on the right
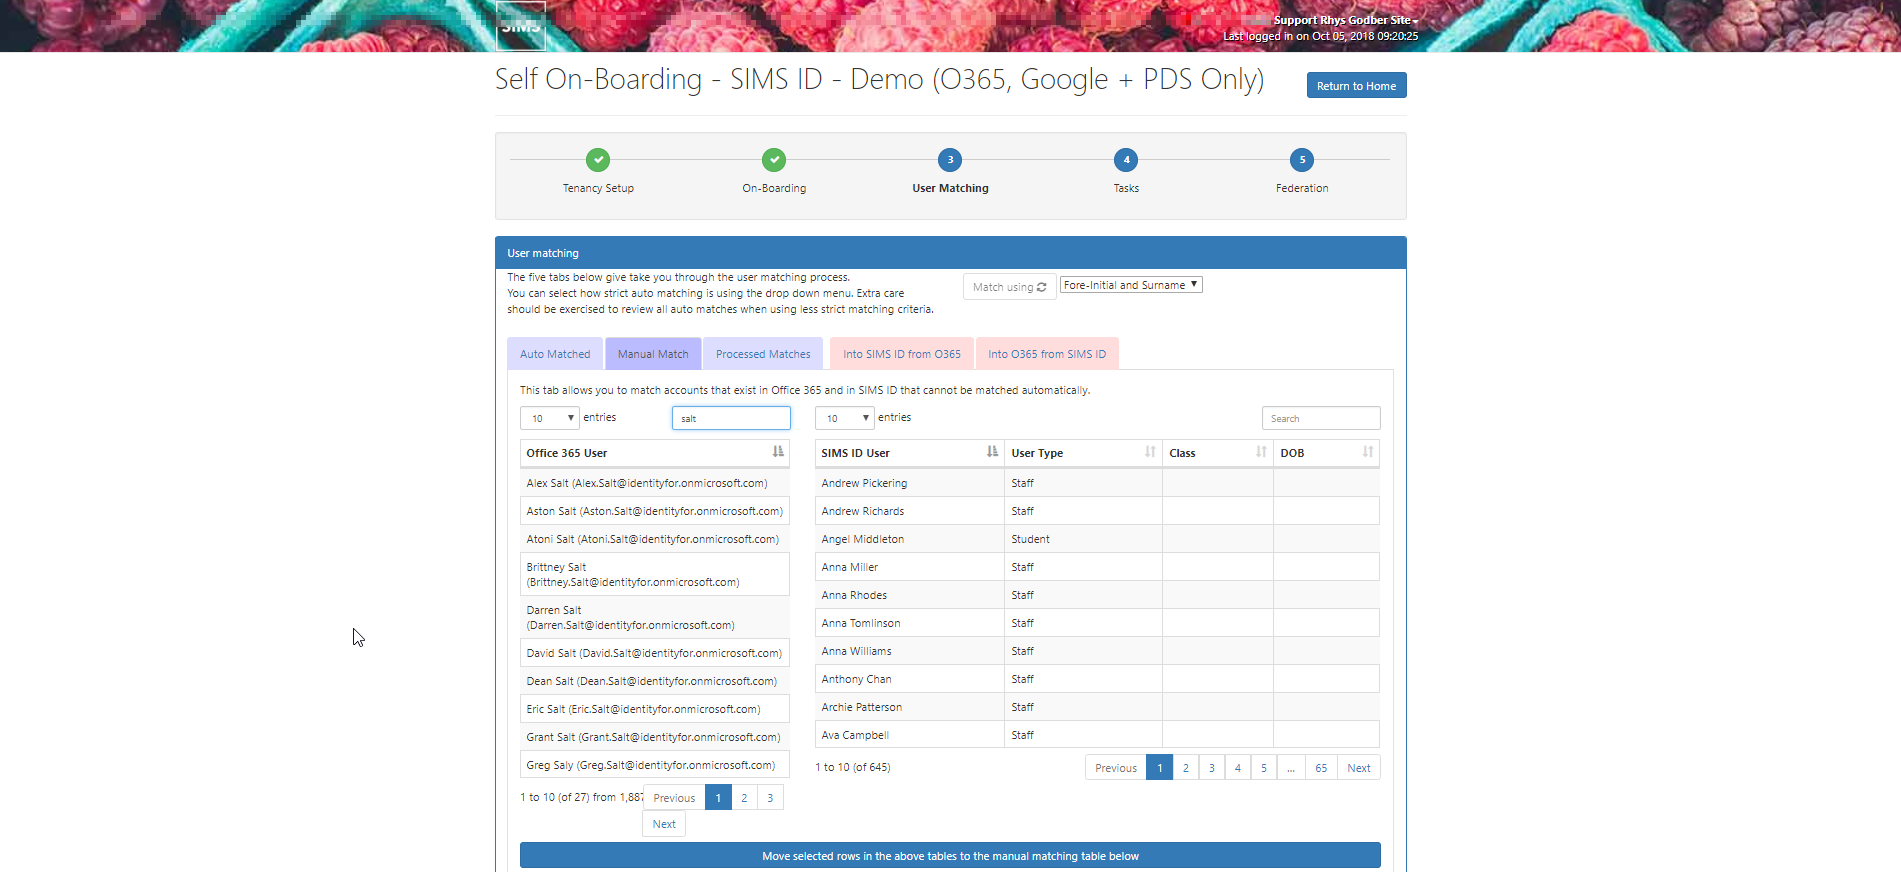
Both lists are sortable and searchable
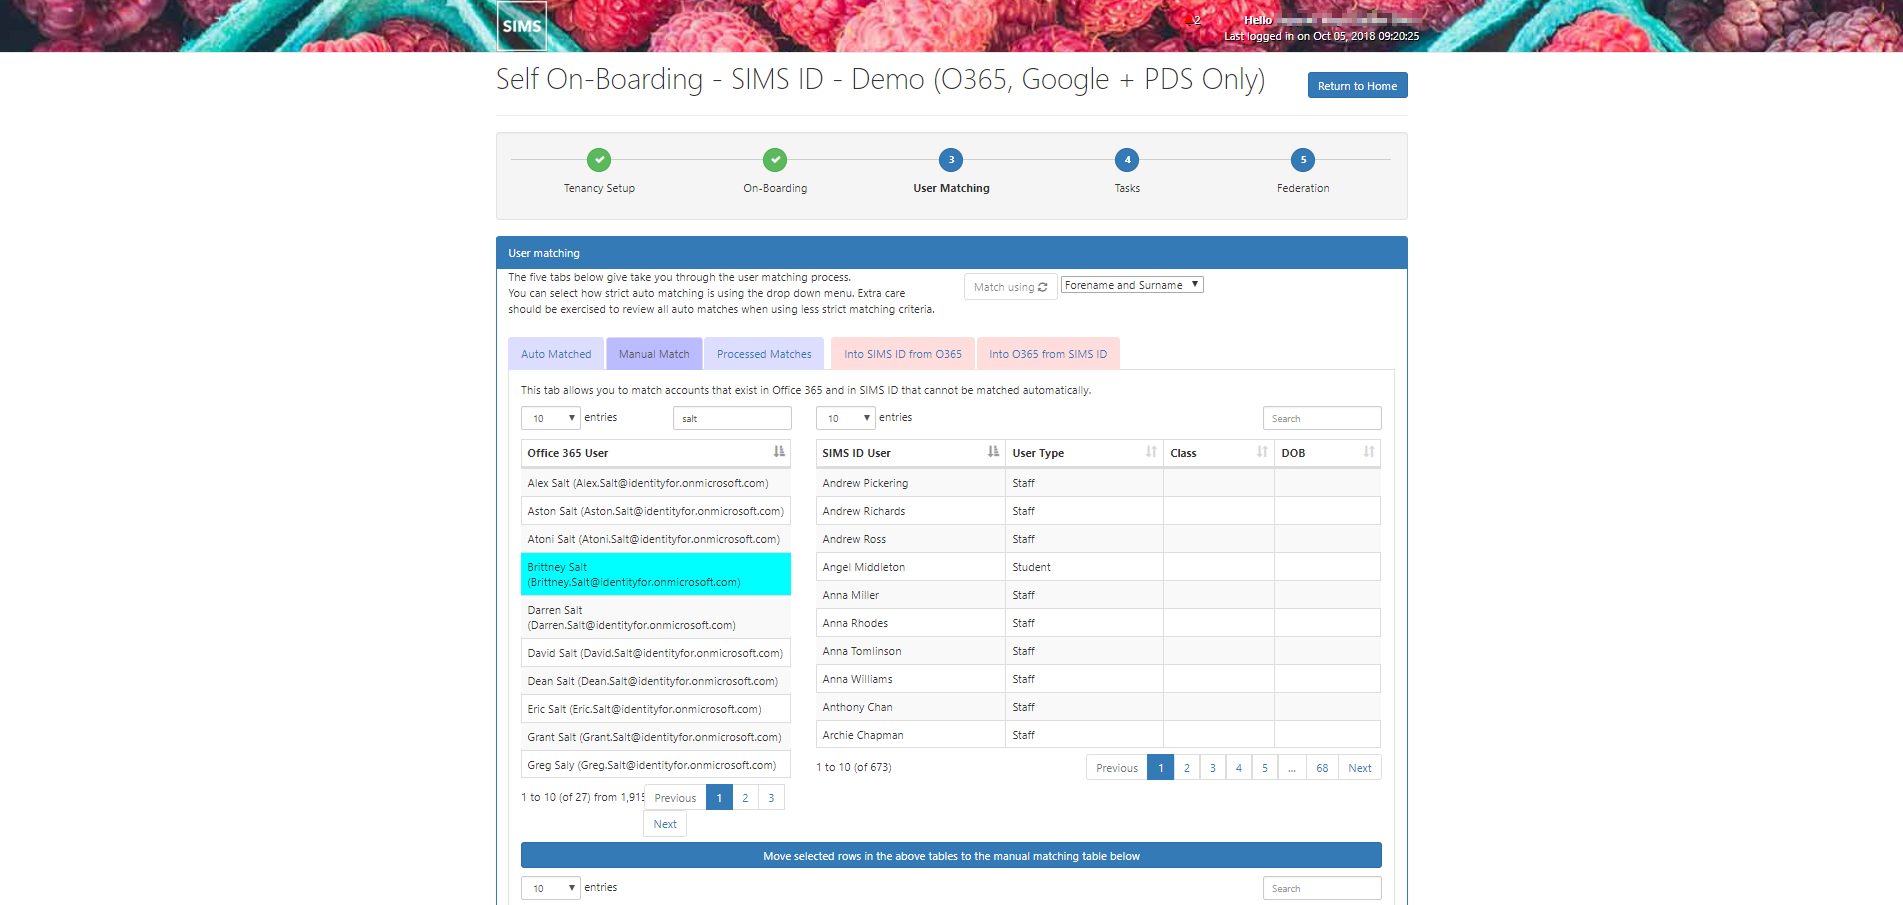
Use the lists to identify users that could not be automatically matched
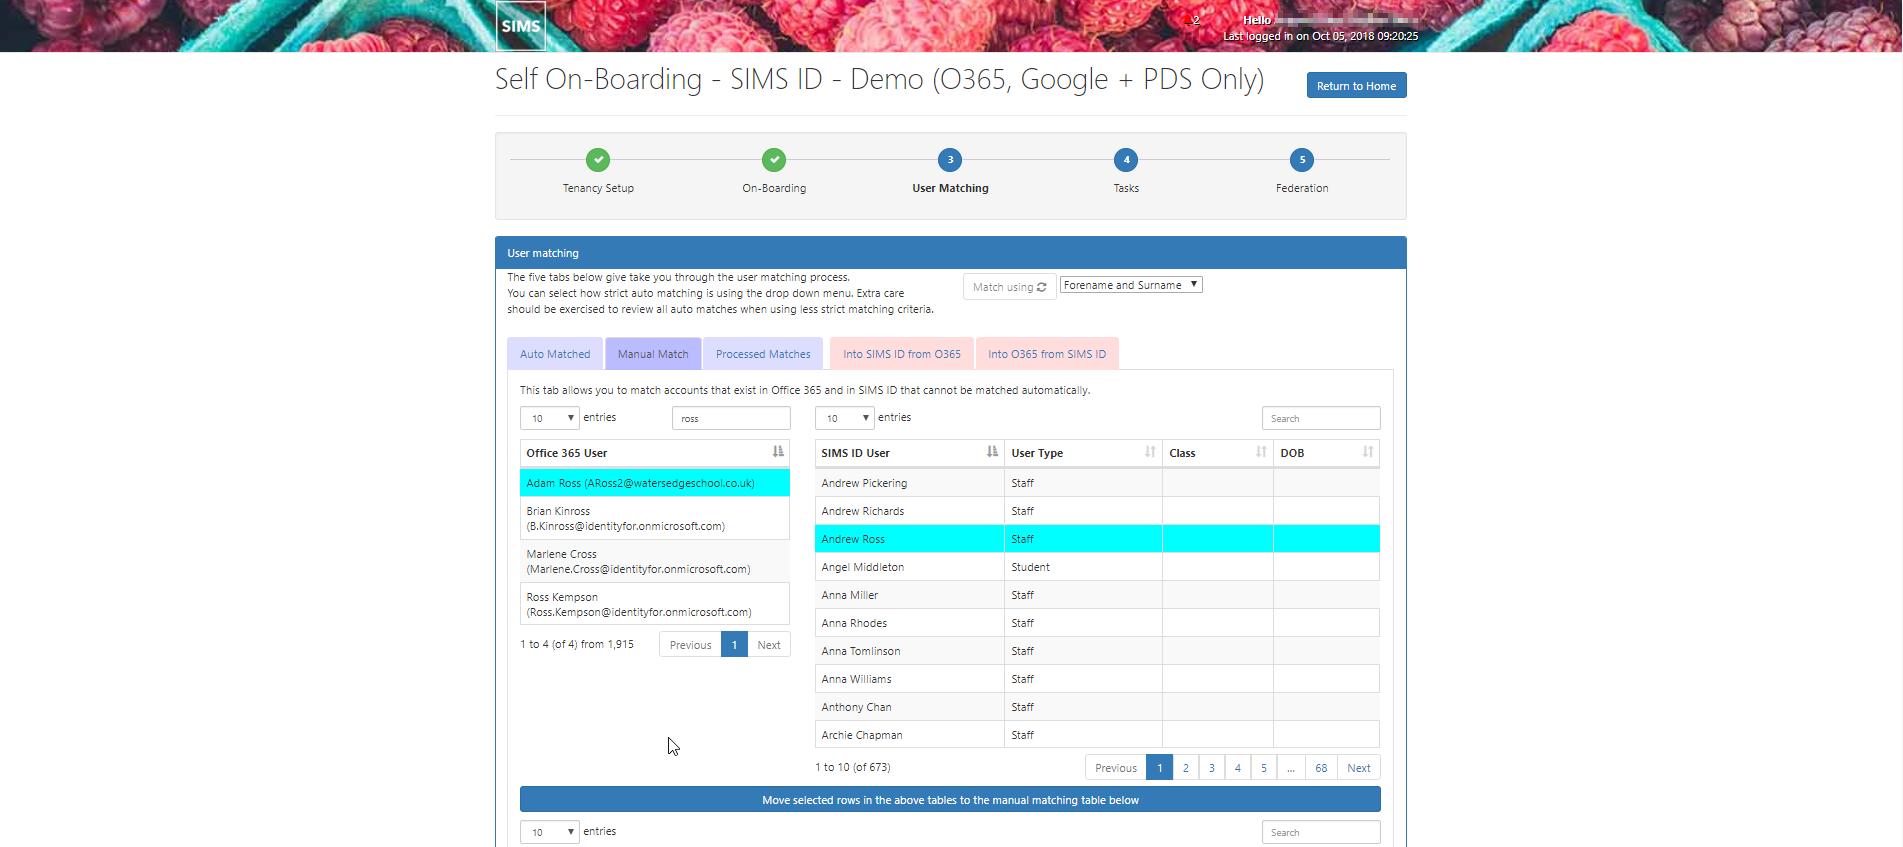
Click on the identified user in the left-hand list and the corresponding user in the right-hand list as shown in the image above. Then click the large blue "Move selected rows in the above tables to the manual matching table below"

All your matched users will now be in the table at the bottom of this page.
Do not leave this page without completing the next action
Please review the manually matched users. You may exclude any you have incorrectly matched using the red trash can next to the user. This will remove them from this table and allow them to be rematched.
Once you are happy with the manual matches please press the green Synchronise matched users button.
Please wait while these users details are written to SIMS ID and Office 365.
The screen will reload the data from SIMS ID and Office 365 when complete.
Reviewing matched users
The next tab allows you to view all users that have been matched by the automatic and manual processes.
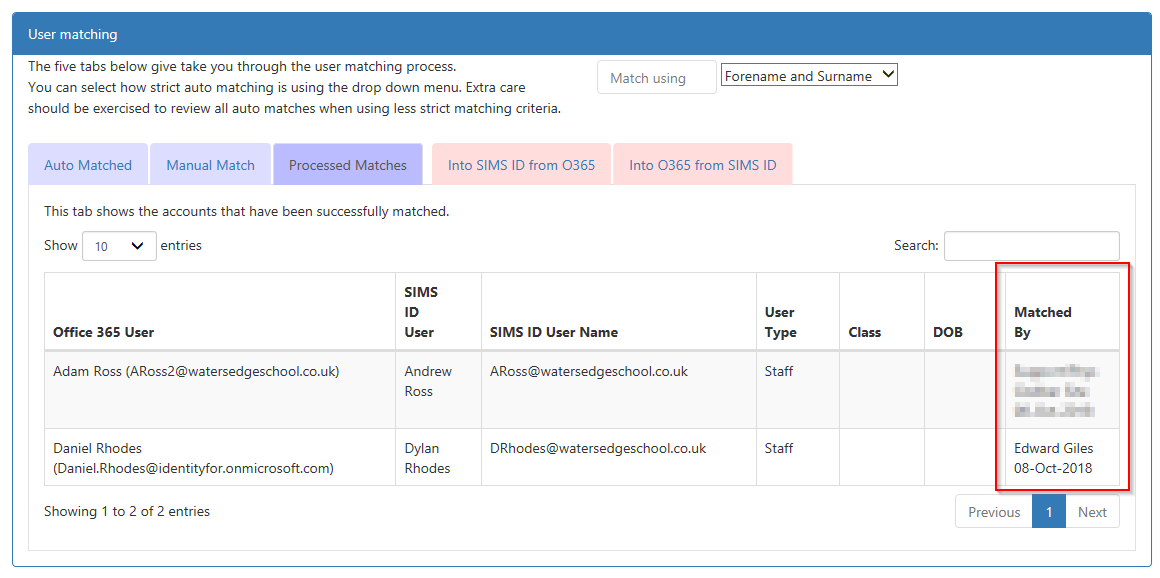
Please note that an audit of who performed the match is recorded for your convenience.
Creating SIMS ID account for users in Office 365 who have no corresponding SIMS Data

The fourth tab shows Office 365 accounts that have not been matched. In some cases, this may be because the account is not associated with a record in SIMS. In order to maintain access to these accounts, you should create a SIMS ID account. This is not necessary if the account ends in .onmicorosoft.com.
To create SIMS ID accounts you should slide the Create slider next to the relevant account to On
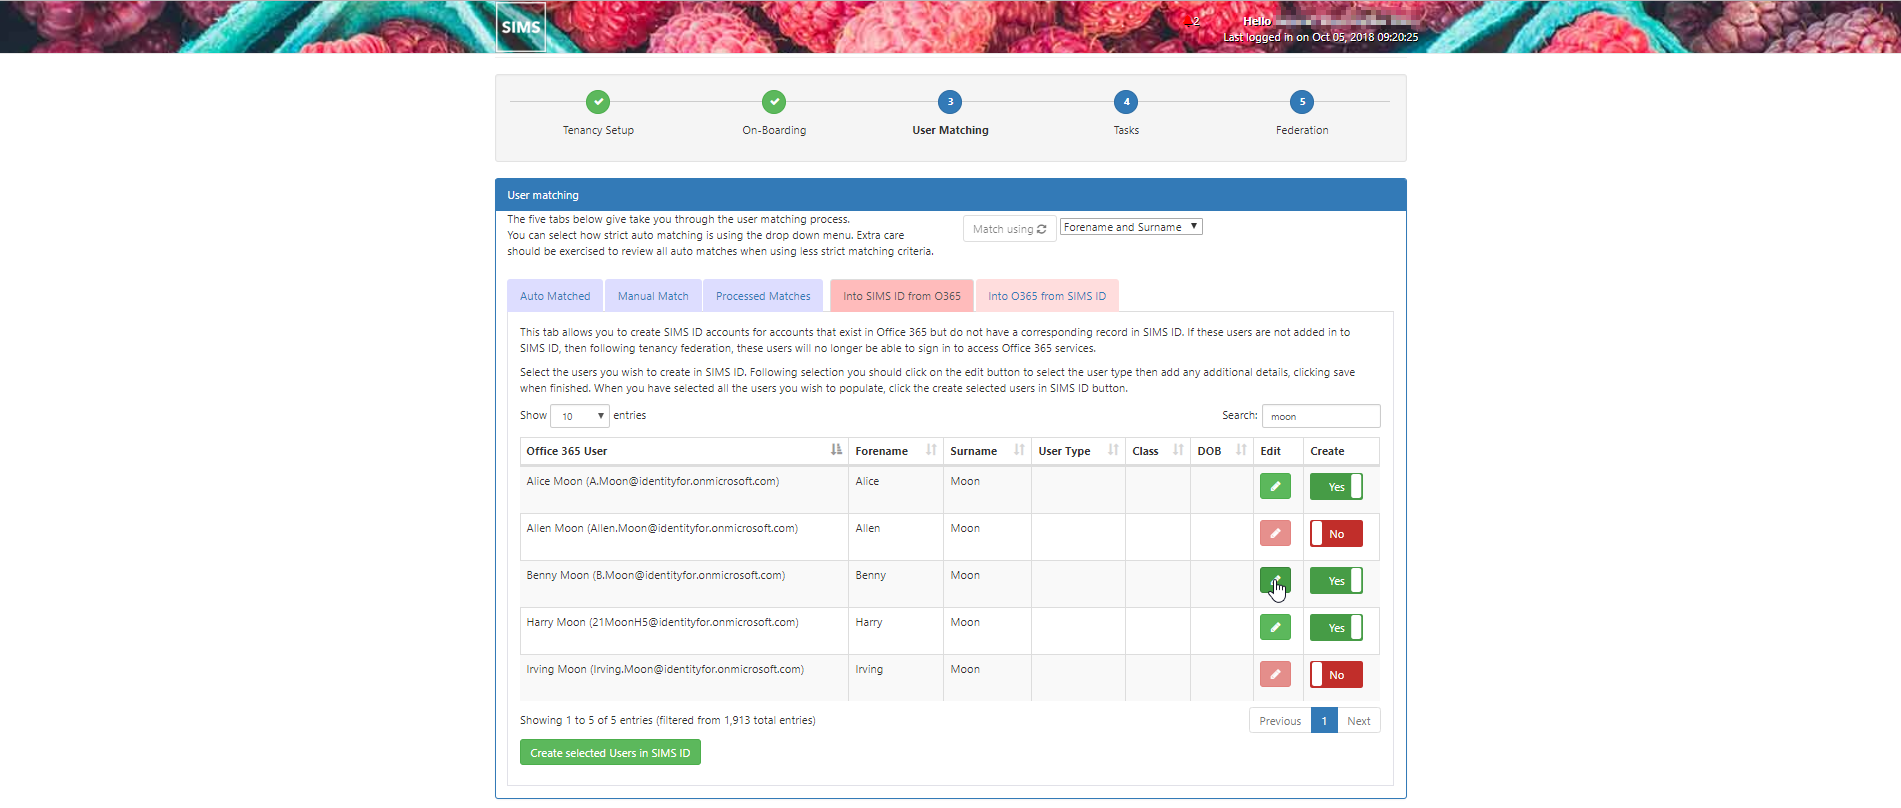
This will enable the green pencil Icon allowing you to add necessary additional data. Click on the pencil to do this.
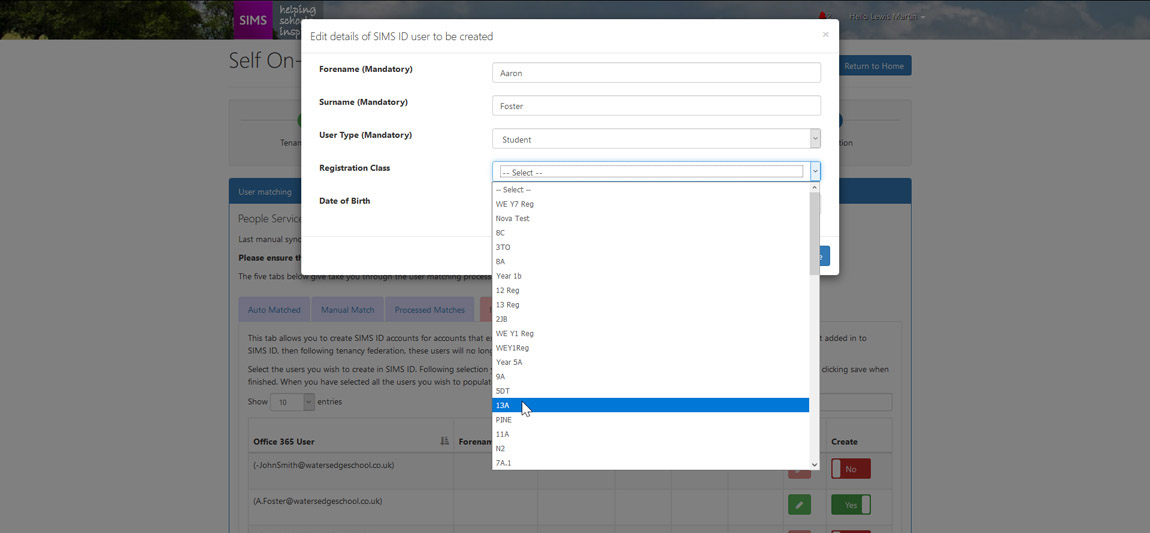
Forename and Surname may have been populated automatically from Office 365, if not you are required to populate these fields. User Type is also a required filed and is used to assign licenses and restrict access to some features.
For students, you may want to populate (Registration Group) or Date of Birth. The list of available groups and classes is populated from SIMS. These two fields are optional. When you have completed filling in the data please click Done
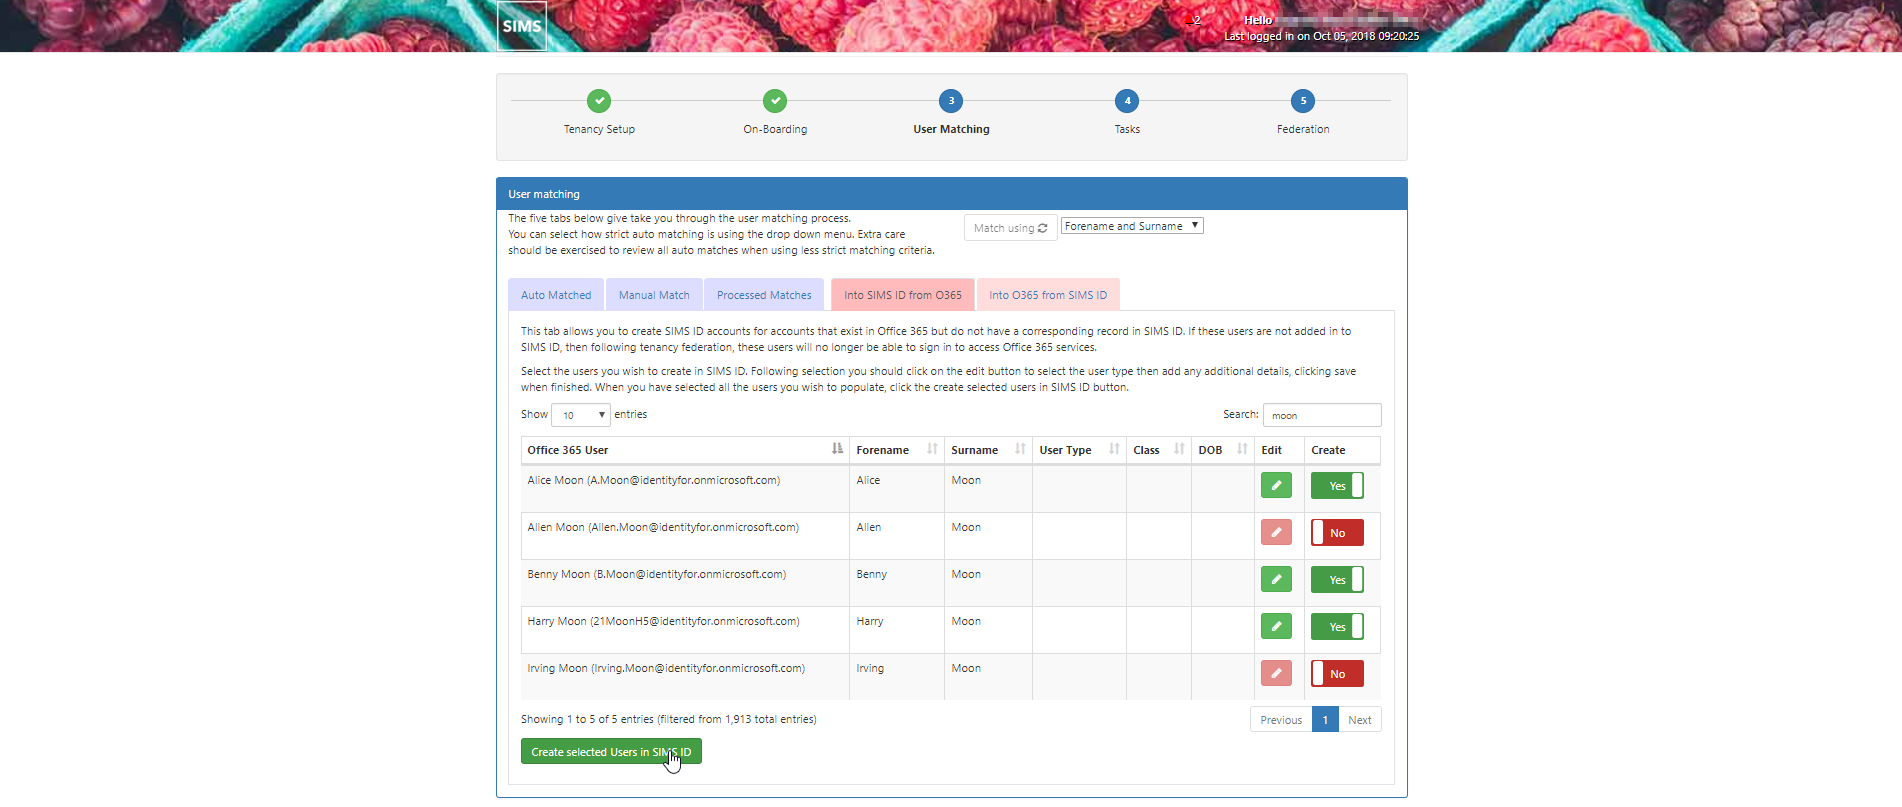
When you have finished selecting the accounts to provision into SIMS ID please click the green Create selected users in SIMS ID button.
Please wait while these users details are written to SIMS ID and Office 365.
The screen will reload the data from SIMS ID and Office 365 when complete.
Creating Office 365 accounts for users who do not have them
The final tab allows you to create office 365 account for SIMS ID users that have not got them. This is an optional step. You can provision Office 365 users from SIMS ID at any time in the future from inside User Management.
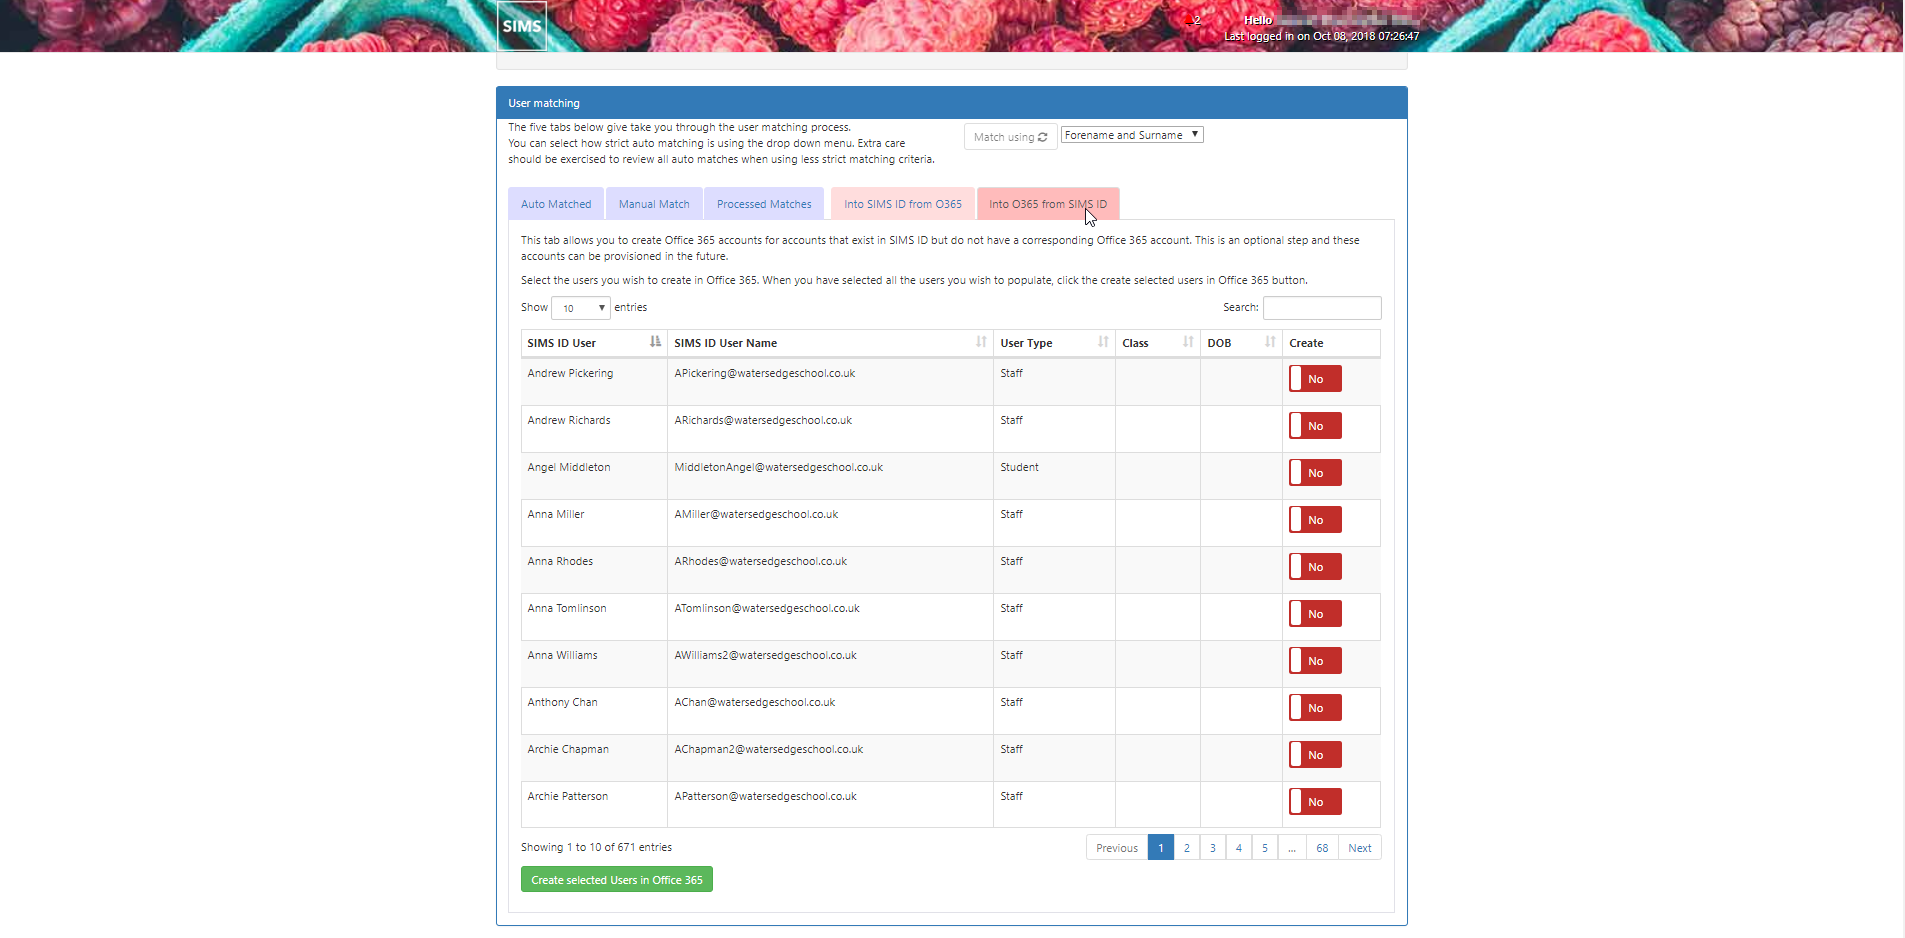
If you wish to do this now please select the accounts you wish to create using the slider next to the user.
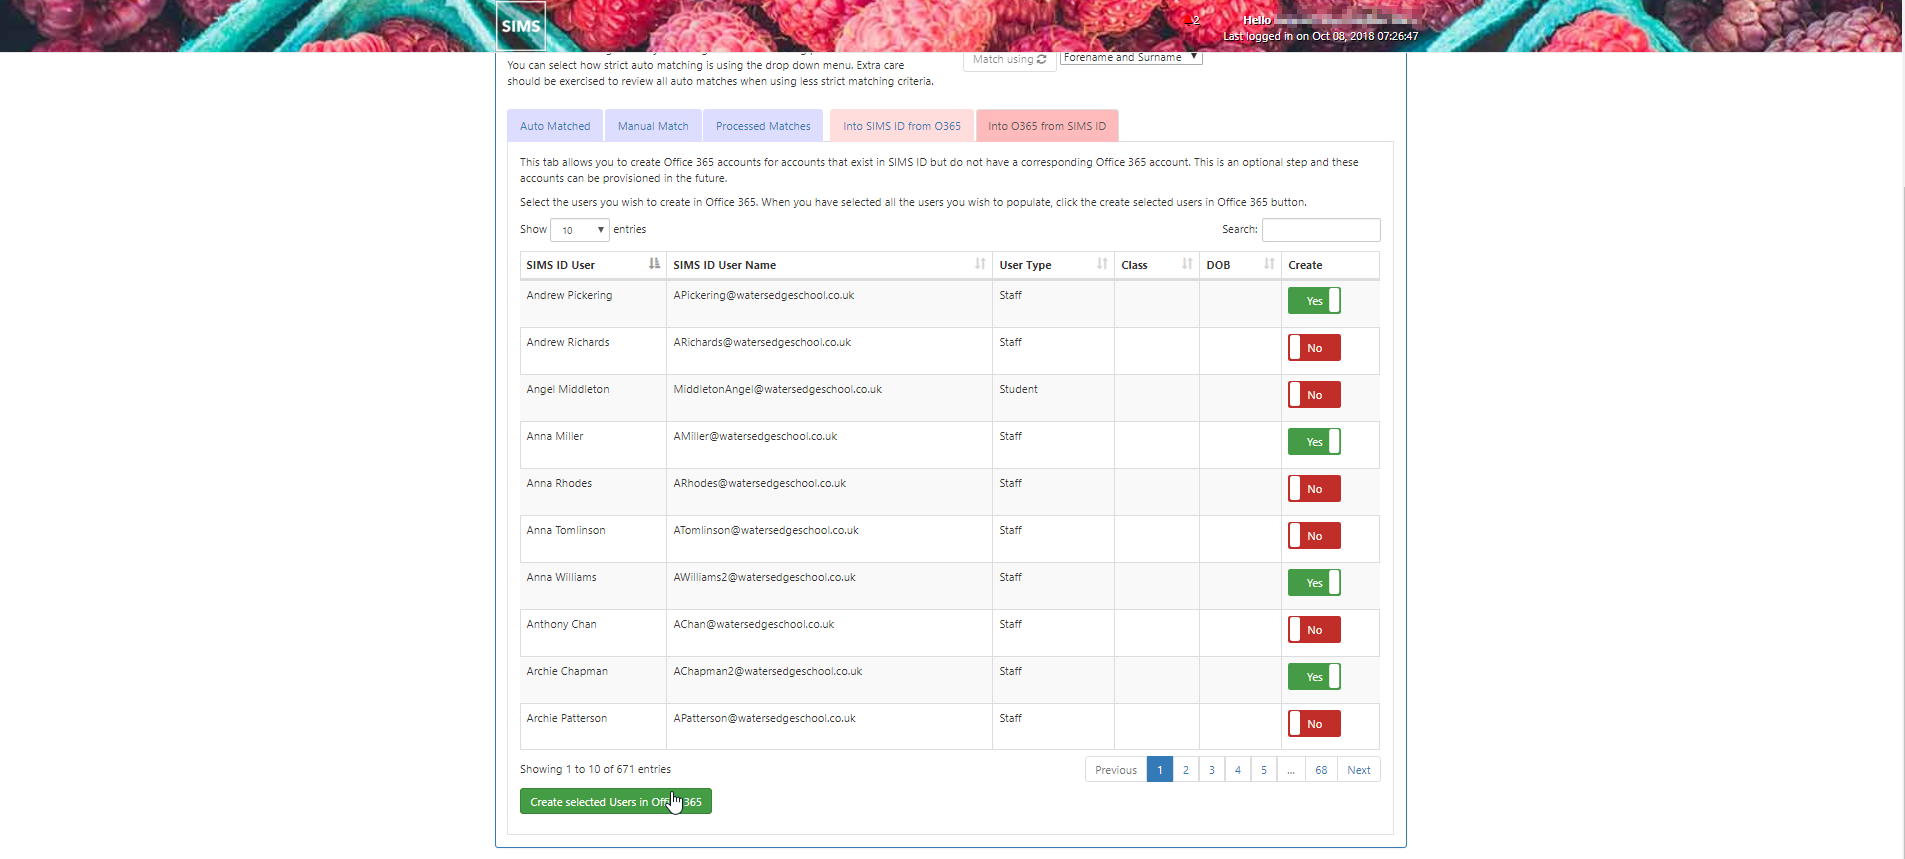
Once you have selected all the users you wish to create office 365 accounts for please click on the green Create selected users in Office 365 button. This will start the provisioning process. This may take several minutes.
The screen will reload the data from SIMS ID and Office 365 and you will be able to move on while the account provision by clicking the next button.
You will then be presented with quick links to allow you to set up additional options for automatic group management and automatic allocation of Office 365 licenses.
You can access these tools at any time from within Options. You may want to review the support materials for Managing Groups & managing multiple Office 365 Licenses

Sign-On Federating your Office 365 tenancy for Single Sign On from SIMS ID.
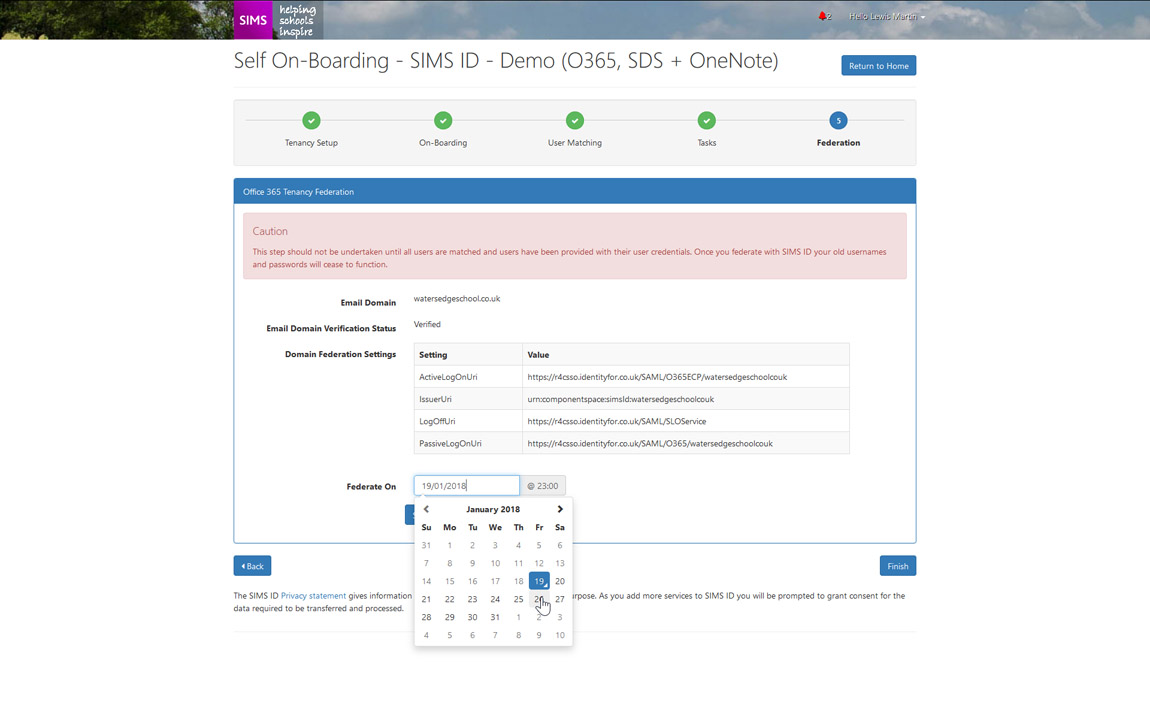
Federating your Office 365 Tenancy and SIMS ID is the final step
Federation of the tenancy takes place out-of-hours.
Please use the date picker to select a date for Federation to take place.
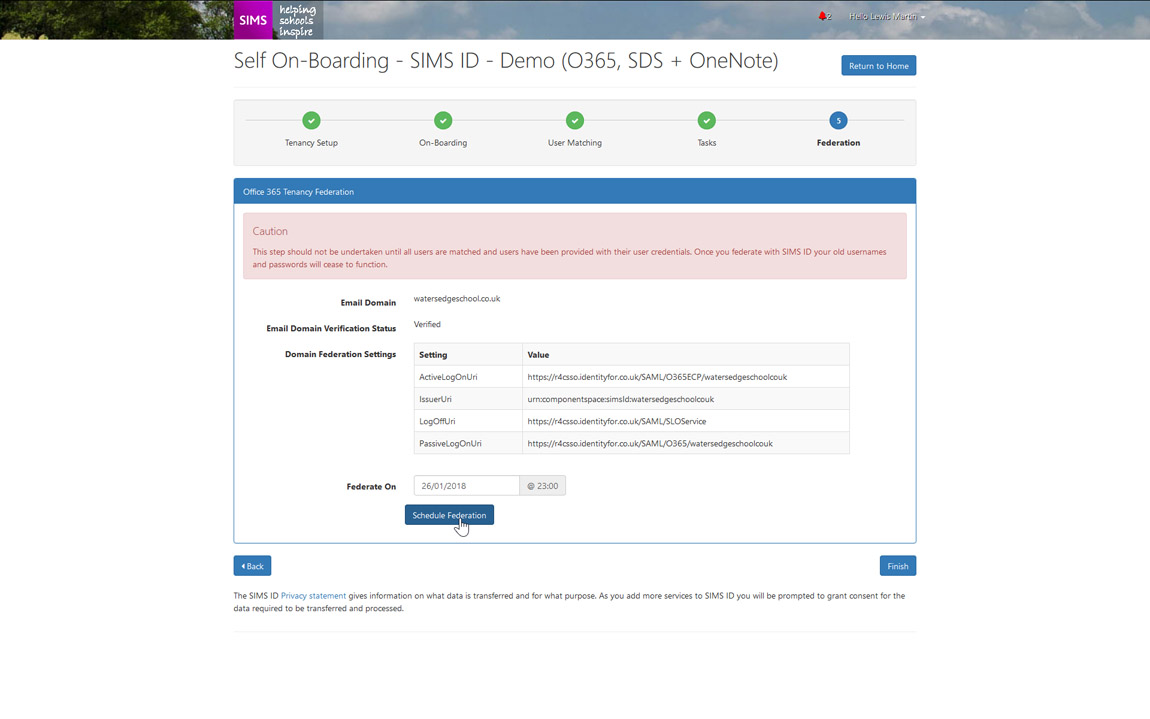
When you have selected a suitable date please click the blue Schedule Federation button
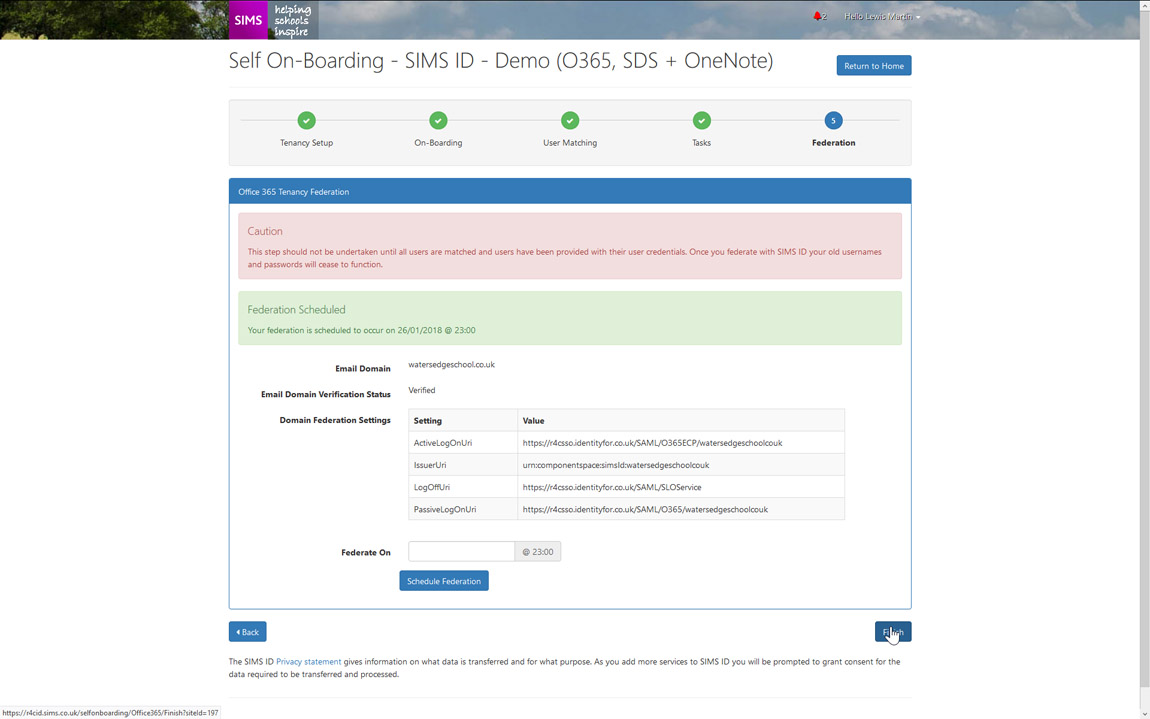
A confirmation message is given. Now click the blue Finish button
Next Steps
Congratulations you have completed the Office 365 self-onboarding process.
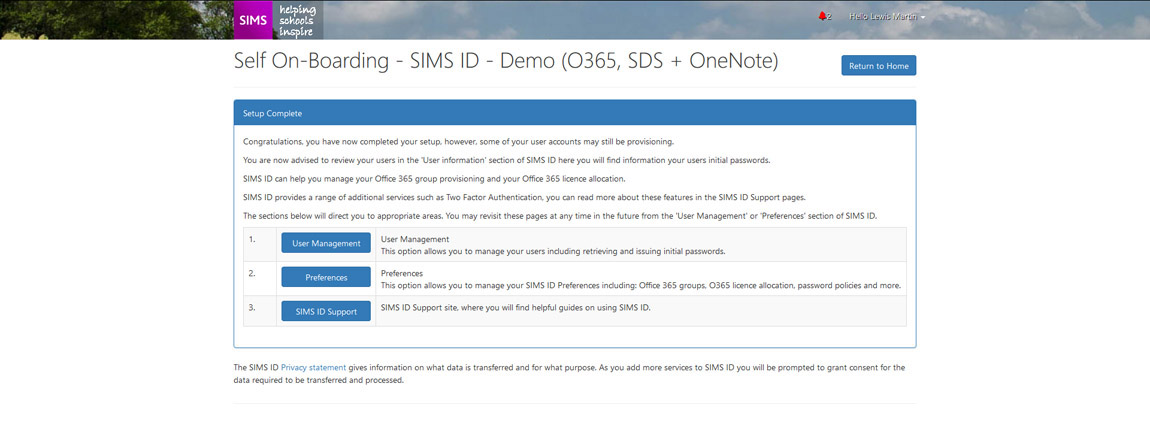
You are provided with some helpful links to the User Management area of SIMS ID and the Preferences area of SIMS ID. A link is also provided to the support documentation site for SIMS ID.
You may wish to view the Information for Site Administrators section of this help site.