Tilestore Overview
Using the Tile Store
The SIMS ID Tile Store allows you toto:
- Create
customisecustom tiles for yourLaunchersite. Access
page.centrallySomeprovided tiles including:- tiles made available to all schools
- third-party Single Sign-On applications
- third party Applications that exchange data with SIMS.
of- Audience these tiles
willsoallowthatSingletheySignare available ontothealaunchrangepad for all users, groups ofPartners andusers orServices. You can choose from a selection of additional Tiles to add to the Launcher andevencreatespecificnewindividuals.
Accessing ones.the Tile Store
The Tile Store is accessible via the Tile Store tile aton the bottom of
the Launcher page.Page of SIMS ID. Only admin users will have access to this tile.

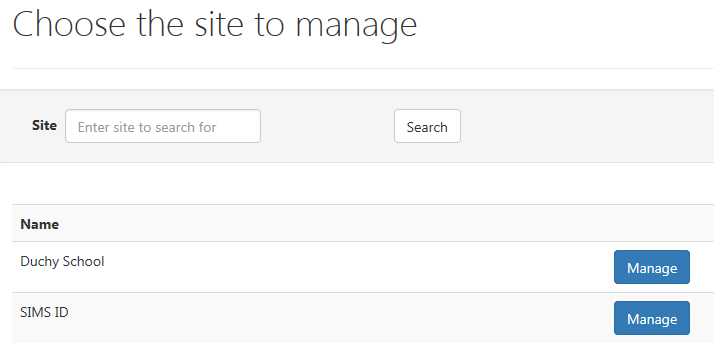
If you have admin access to more than one site, when you access the Tile Store you will first be asked which site’s Tile Store you wish to manage.
Managing
A Tiles
Addingsearch Tilesfacility tois theavaialble Launcher
When you first accesson the Tile Store you will see all the available
tiles you can addscreen to yourhelp Launcher page.
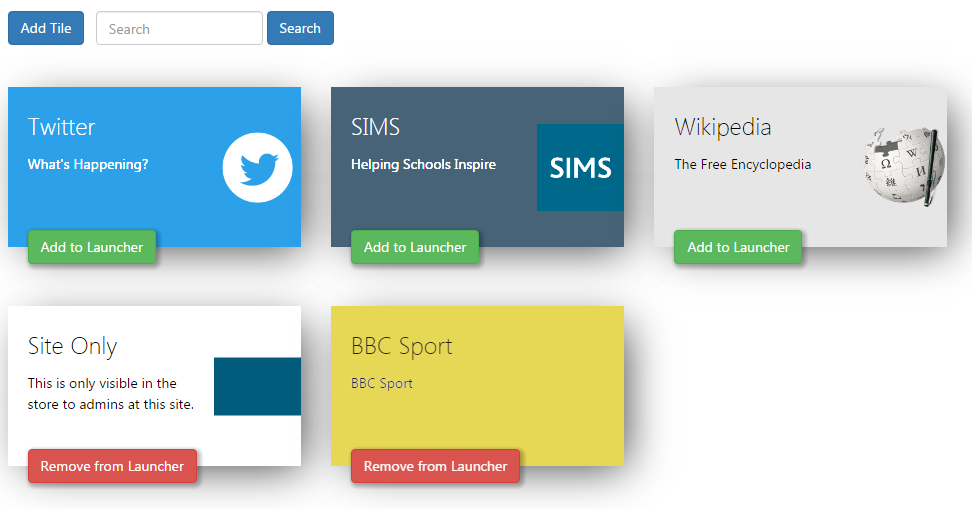
As the Tile Store grows you may want to make use of the Search
functionality toquickly locate tiles you are looking for.
Each
The tileTile hasStore aInterface
The buttonTile onStore itis split into two sections.
Available Tiles and Available Applications
The Available Tiles screen
Available Tiles contains:
- Tiles that have been created at your site
- Tiles that are centrally available such as links to the DfE or Welsh Government Education Sites
- Applications that have been installed from Available Applications.
To remove a tile after you have added it simply access the Tile Store,
locate the tile and clickfrom the RemoveAvailable from LauncherTiles button.screen
Available Tiles Screen Actions
Adding a New Tile to the Tile Store
As a site admin you have the ability to create your own tiles that will only be visible in the Tile Store at the site you create them in.
To add a new tile,
Access the Tile Store from the Launcher page
Choose a site to manage (if applicable)
Click the Add Tile button
You will now see the Add New Tile page
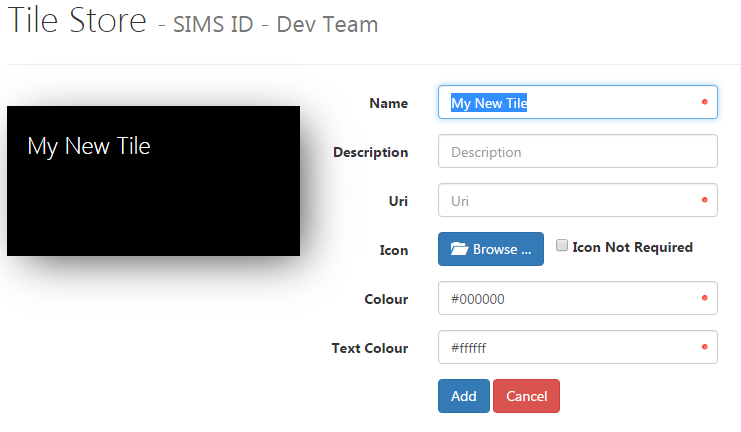
Enter a Name for you tile
Enter a Description for your tile (optional)
Enter the URL that will load when your user’s click the tile e.g. http://www.bbc.co.uk
(Optional) Click the Browse button to add a picture to your tile. PNG, JPEG and GIF files are supported. If you do NOT want an icon tick the Icon Not Required checkbox
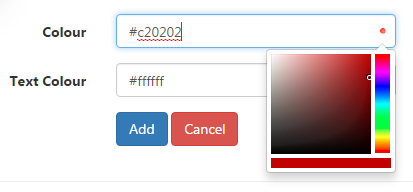
Click the Colour textbox and a colour picker will appear allowing you to change the background colour of your tile (you can also type the name of a colour e.g ‘yellow’ into this box
Click the Text Colour textbox to change the text colour
When you are happy with the look and feel of your tile simply click the Add button
Your new tile will now appear in the TileAvailable StoreTiles screen (for the site you are
managing)managing).
Editing and you can add it to the Launcher page by clicking the Add
to Launcher button below it.
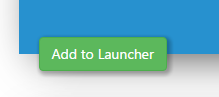
When you click “Add to Launcher” you will be asked who you want the tile
visible to.
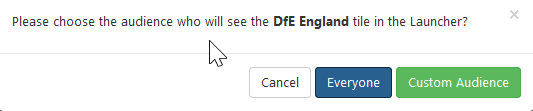
You can choose Everyone to make the tile visible to everyone at the site
or Custom Audience if you want to be more selective.
Clicking Custom Audience opens up a selector where you can grant access
to the tile to:
Site roles or groups that are either pulled through from SIMS or managed
in SIMS ID.
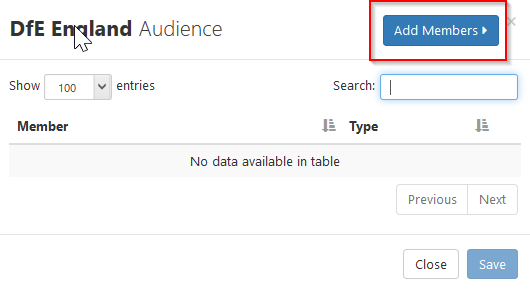
Click “Add Members” to display the available groups.
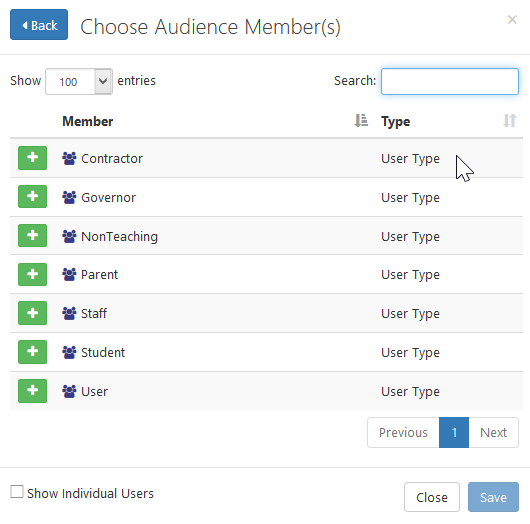
Clicking the + adds this group. The group then disappears from the
available list.
If you want to add individual users, you can tick the “Show individual
Users” check box
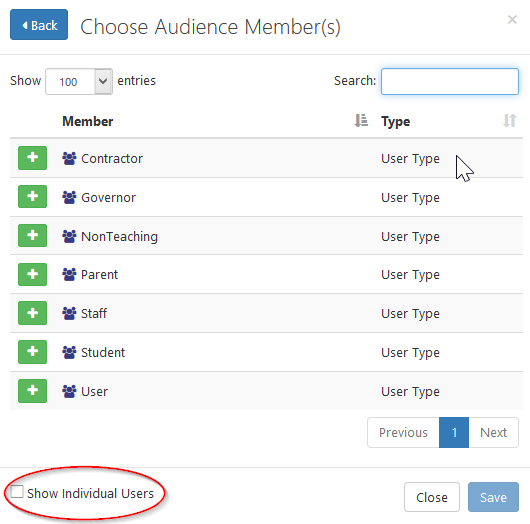
The display will then show individual users that can be added in the
same way.
<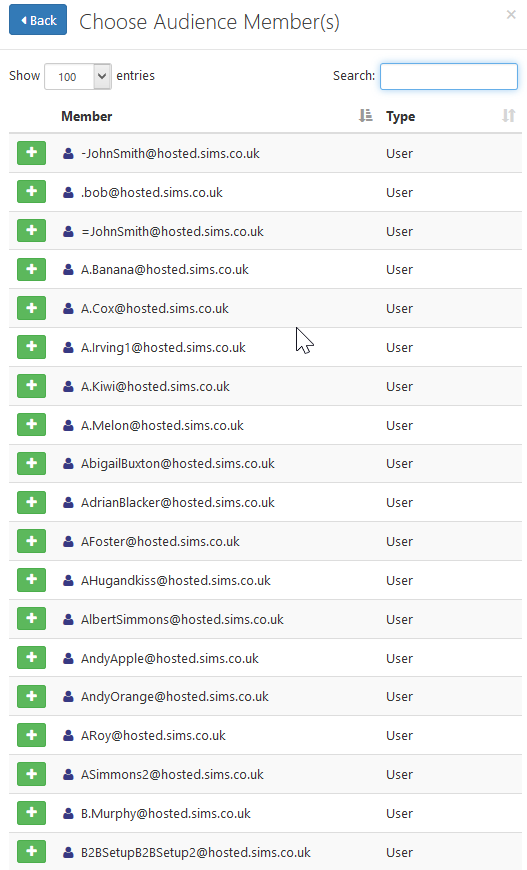
The search box at the top of the list makes finding individuals easy.
Once done Click ‘Save’ and a confirmation dialogue will be displayed
showing the changes you are about to commit.
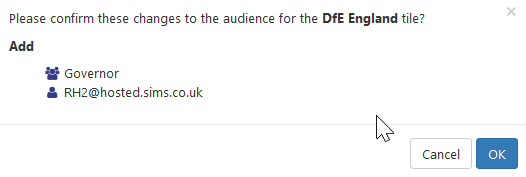
Click ‘OK’ to commit those changes.
Modifying a tiles audience.
Once a tile is added to one or more users Launcher Page you can see two
buttons on the tile, inside the tile store.
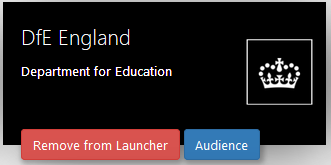
“Remove from Launcher” removes the tile from everyone and ‘Audience’
which allows you to see who has access to the tile and modify it.
Clicking ‘Audience’ shows who can currently see the tile
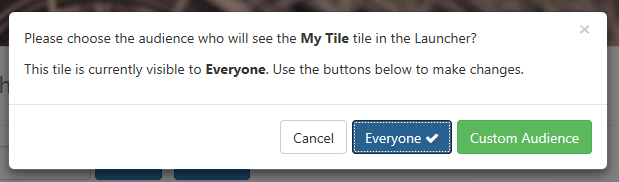

Clicking ‘Everyone’ will change the audience to everyone at the site.
Clicking ‘Custom Audience’ will allow you to remove groups and
individuals.
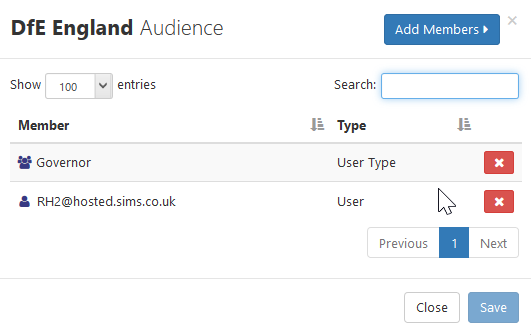
Click the red ‘X’ to remove the group or user and click ‘Save’ to
finish. You can add more groups or individuals using the ‘Add members’
button as previously described.
Editingdeleting your Tilestiles
You are able to edit and delete the tiles that you haveare created only.at your site.
Deleting a tile
To deleteremove onea oftile that has been created at your tiles,site access the Tile Store,
Locate the tile and click the Remove from Launcher button to De-Audience it. You can now delete the tile.
Hover the mouse over the tile
Click the red X that appears in the top right corner
 >
>
NOTE! If you are using a mobile device you can swipe left or right on a tile to delete it
- A dialog will appear asking you to confirm you want to delete the tile
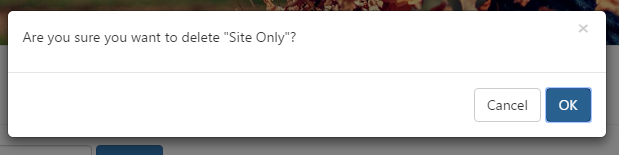
- Click OK and the tile will be deleted.
Editing a tile.
To edit one of your tiles,tiles:
Simply click on the tile (on mobiles you may have to tap twice)
You will be taken to the Edit Tile Page
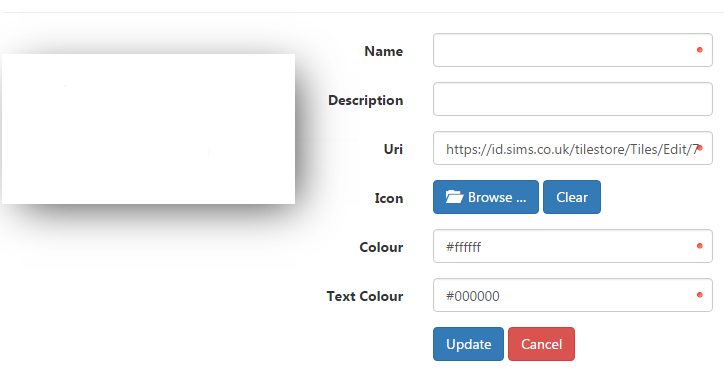
The page operates exactly as the Add New Tile page (see above)
Make any desired changes and click Update to save
Your changes will immediately be visible, both in the Tile Store and on your user’s Launcher pages (if you had previously added it).
Audiencing a tile
Tiles that are available for advancing will have a blue Audience button on them. This button allows you to add the tile to the Launcher page of selected users or even all users at the sites.
When you click “Add to Launcher” you will be asked who you want the tile visible to.
You can choose Everyone to make the tile visible to everyone at the site.
Clicking Custom Audience allows you to be more selective and opens up a selector where you can grant access to the tile to:
Site roles or groups that are either pulled through from SIMS or managed in SIMS ID.
Click “Add Members” to display the available groups.
Clicking the + adds this group. The group then disappears from the available list.
If you want to add individual users, you can tick the “Show individual Users” check box
The display will then show individual users that can be added in the same way.
<
The search box at the top of the list makes finding individuals easy.
Once done Click ‘Save’ and a confirmation dialogue will be displayed showing the changes you are about to commit.
Click ‘OK’ to commit those changes.
De-Audiencing a tile
Once a tile is audianced (added to one or more users Launcher Page) you can see two buttons on the tile, inside the tile store.
“Remove from Launcher” removes the tile from everyone, it De-Audinaces the tile
Modifying a tiles audience.
The * ‘Audience’* buttom allows you to see who has access to the tile and modify it.
Clicking ‘Audience’ shows who can currently see the tile
Clicking ‘Everyone’ will change the audience to everyone at the site. Clicking ‘Custom Audience’ will allow you to remove groups and individuals.
Click the red ‘X’ to remove the group or user and click ‘Save’ to finish. You can add more groups or individuals using the ‘Add members’ button as previously described.