Managing Hosted SIMS or FMS users
Adding a new staff member follows this process.
Create the new staff member in SIMS Personnel. This [Quick reference]http://simspublications.com/985623/assets/qrsaddingastaffmember.pdf) sheet will guide you through the steps.
Setup the user in SIMS System Manager and grant them the required SIMS Permissions.
Wait up to 70 Minutes for your new user to appear in your SIMS ID user list
Change the user's security groups to include SIMS and any other hosted SIMS application (please see page 28 of this guide)
Pick up the users new SIMS ID username and password from the “unclaimed password” list in SIMS ID
Once the user has been created in SIMS System Manager they will shortly appear in the “Users” list of SIMS ID. Once a user has been created from SIMS and is managed in SIMS ID they cannot be deleted manually from SIMS ID, staff should have their contract set to expire and be removed from SIMS system manager as well as having their SIMS ID permissions removed.
Granting SIMS ID users access to SIMS
After logging into https://id.sims.co.uk](https://id.sims.co.uk/) as a SIMS ID Site Administrator click on the Orange “Users” icon and then the Blue “Manage Users” icon
If you are a SIMS Support Unit or a Multi Academy Trust you will be asked to select the school for the users you wish to manage. A list of all of your > users for the school are displayed, you can filter these by clicking on a filter type such as Admin users. The user's list is based on the 'live' staff in SIMS and is updated up to an hour after new users are created \ recorded in SIMS.
The list of users can be filtered using the filter buttons above the list of users. Filtering by “Locked out Users” shows users who have failed to answer their security questions three times. Inactive users will be users that have been disabled in system manager or have an expired contract date in SIMS personnel. You can also search for a user by typing all or part of their name.
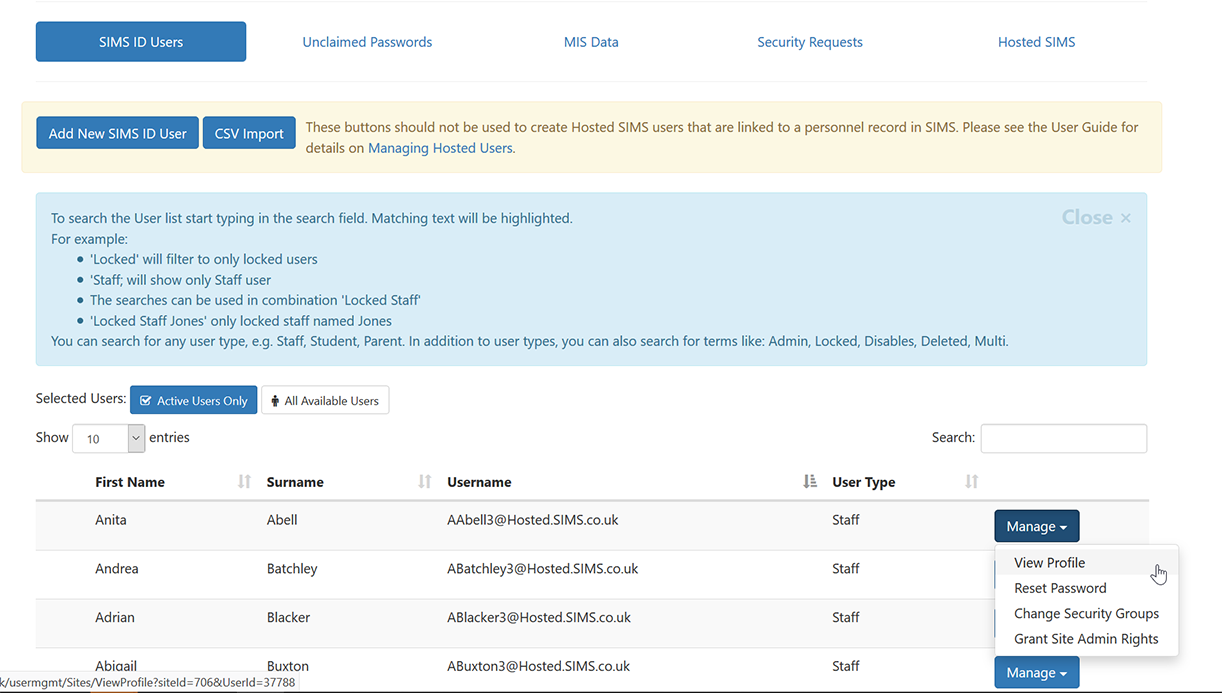
To manage a user click the “Manage” button to the right of the user’s username. Users with the menu icon on the right of the screen are Site Admin users and cannot have their permissions changed by other Site Admin users. Changes to Site Admin users can be requested by logging a with support call.
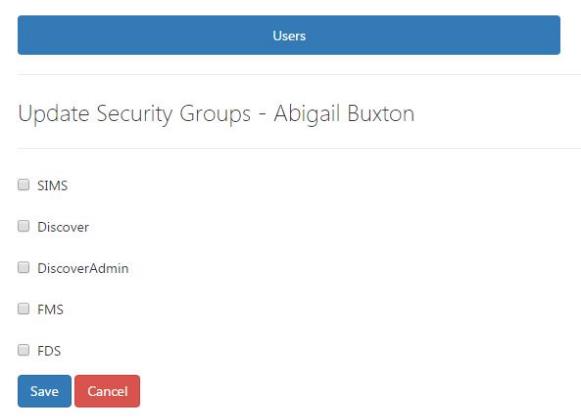
To grant a user with access to a hosted application choose “Change Security Groups” from the Manage button. Tick the applications you wish to grant the user access to and click “Save”. This will place a Tile on the user's launch screen or remove a Tile from the user's launch screen if un-ticked.
Please note: If you require access to a specific Northampton application please log a support call to have these enabled.
Hosted SIMS Licences
If you receive a message “You have run out of Hosted SIMS Licences”, please remove all of the ticks from users who no longer require access and click save, this will free up licences back to your school.
Alternatively please log a support call to discuss purchasing additional licences. You will also receive a warning message when you are running low on licences.


Removing access to SIMS ID, SIMS and FMS
To remove access to all applications it is recommended changes are made both within the application and within SIMS ID.
- Login to https://id.sims.co.uk as a SIMS ID Site Admin click on the Orange “Users” icon and then the Blue “Manage Users” icon
Find the user you wish to remove access for, you can also search for a user by typing all or part of their name.
Click the “Manage” button to the right of the user’s username and reset the users password so that they can no longer access SIMS ID
Click the “Manage” button and select “change security groups” Untick all of the application security groups and click save.
Remove the user’s permissions from SIMS and change the user’s personal record to reflect their current status.
If required remove the users permissions from FMS.