Linking SIMS ID to Google
Google Onboarding SIMS ID and Google Tenacy Steps
- 1. Instructions for a new Google tenancy with NO current users - Google Provisioning
- 1.1 Pre-Step 1 - Create the Google tenancy
- 1.2 Pre-Step 2 - Obtain Username and PW for the site in question
- 1.3 Step 1 - Setup SIMS ID perquisites
- 1.4 Step 2 - Set username formats etc
- 1.5 Step 3 - Link SIMS to SIMS ID.
- 1.6 Step 4 - Link SIMS ID to Google
- 1.7 Step 5- Accounts will provision to Google
- 1.8 Step 4b Set SIMS ID Google Preferences
- 1.9 Step 6 - Issue usernames and passwords
- 2. Instructions for an existing Google tenancy with existing staff or student user accounts Provisioning & user matching
- 2.1 Pre Step 1 - Acquire the Google tenancy
- 2.2 Pre Step 2 - Obtain Username and PW for the site in question
- 2.3 Pre Step 3 Extract users from Google tenancy
- 2.4 Pre Step 4 Import student email addresses into SIMS using the spring 2020 release feature
- 2.5 Step 1 Setup SIMS ID perquisites
- 2.6 Step 2 Set username formats etc
- 2.7 Step 3 Link SIMS to SIMS ID
- 2.8 Step 4 Run the Google onboarding report
- 2.9 Step 5 Data review
- 2.10 Step 6 Provide CSV to SIMS ID Team
- 2.11 Step 7 - Link SIMS ID to Google
- 2.12 Step 8 Accounts will provision to Google
- 2.13 Step 9 Set SIMS ID Google Preferences
- 2.14 Step 10 Issue usernames and passwords
Instructions for a new Google tenancy with NO current users - Google Provisioning
This method of on-boarding is for a site that does not have users in the Google tenancy. If your tenancy has users that you wish to keep please refer to BROWN FIELD SITES Google Provisioning & user matching
Pre-Step 1 - Create the Google tenancy
Google process
Pre-Step 2 - Obtain Username and PW for the site in question
If you do not have a SIMS ID site you can request one from educationsalesadmin@sims.co.uk
A SIMS ID site will be created, and an initial admin account will be provided.
Step 1 - Setup SIMS ID perquisites
Log in with credentials at https://id.sims.co.uk
Step 2 - Set username formats etc
Please see https://id.sims.co.uk/support/wiki/74/
Step 3 - Link SIMS to SIMS ID.
Please refer to https://id.sims.co.uk/support/wiki/73/
Step 4 - Link SIMS ID to Google
Getting started
Like all application installs this task is initiated from inside the Tile Application Store.
For full information on using the Application Tile Store please see Using the Tile Store an Overview
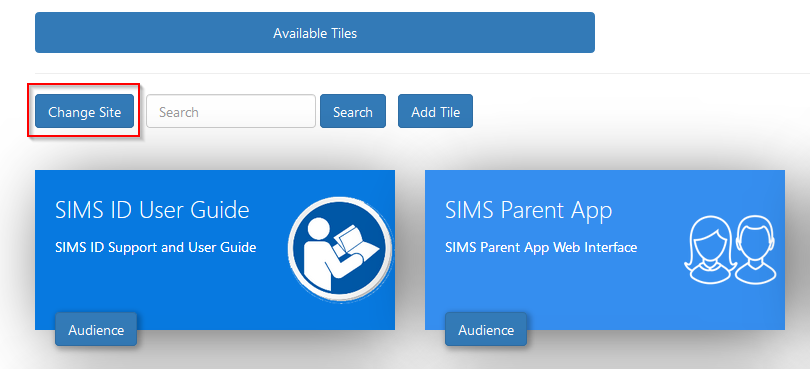
Accessing the Tile Store
Login to SIMS ID https://id.sims.co.uk as a Local Site Administrator,
The Tile Store is accessible via the Tile Store tile on the Launcher Page of SIMS ID. Only admin users will have access to this tile.

If you have admin access to more than one site, when you access the tile store you will be taken to your primary sites Tile store first, if you want to change sites click on the "Change Site" button at the top or the page and a list of available sites will open within the page allowing you to select the site you wish to manage.
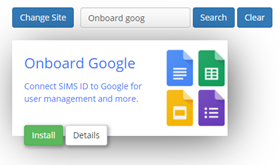
Finding the 'Onboard Google' application
A search facility is available on the Tile Store screen to help quickly locate tiles you are looking for. Search for 'Onboard Google'
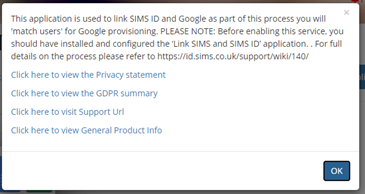
Checking the application
![image title]/gsob/onboardgoogledetailsbutton.png)
On the Application, there is a Details button. Clicking this button will provide you with information about the application. Included are links to the applications:
- Privacy Statement
- GDPR data transfer summary
Support Page
Installing the Onboard Google Application
To install an application, click on the green Install Button on the tile.
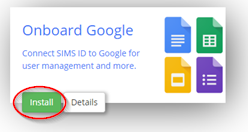
The next screen will inform you that you will agree a GDPR statement later in the process.
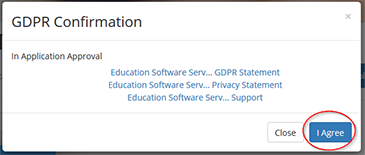
Click I agree.
Once installed the Onboard Google application becomes available on the *Available Tiles screen. You will be taken to this screen.
Configuring the Onboard Google application
To configure the application, click on the 'Onboard Google' application tile.

Entering your Google tenancy details
You will be taken to a page where you are able to enter your tenancy details.
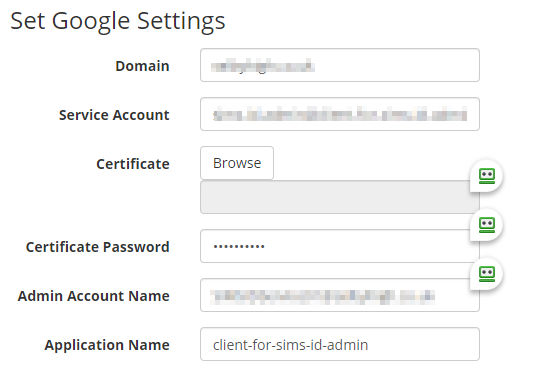
The information you need to provide is.
Domain the domain of the school gsuite email eg: schoolname.co.uk
Service Account This is the service you created in the Google Console under credentials eg: schoolnamelinktosimsid@schoolname-link-to-sims-id.iam.gserviceaccount.com
Certificate this is the PK12 certificate you created and downloaded from the google console.
Certificate Password this is the password of the certificate you made a note of when you created the PK12 certificate in the Google Consoled.
Admin Account name this is the SIMS ID Specific account you will have created for SIMS ID to access the tenancy. Please note we have not provided instruction on how to do this)
Application Name This is the application name for the OAuth 2.0 client you created in the Google console. e.g. Client for schoolnamelinktosimsid
You are advised to set Staff, Students and Groups to ON
Step 5- Accounts will provision to Google
Once the tenancy is configured accounts will now provision to Google
Step 4b Set SIMS ID Google Preferences
Within SIMS ID > Preferences > Connected Services > Google, the below configurations are available
Auto Provisioning of Users and Groups
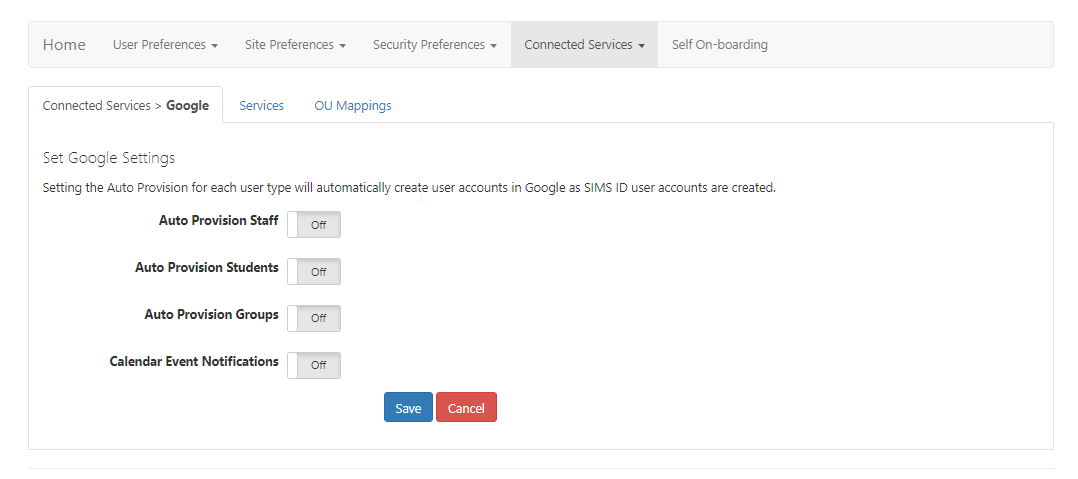
You are advised to set Staff, Students, and Groups to ON if you did not do so at the previous step.
G Suite enabled services

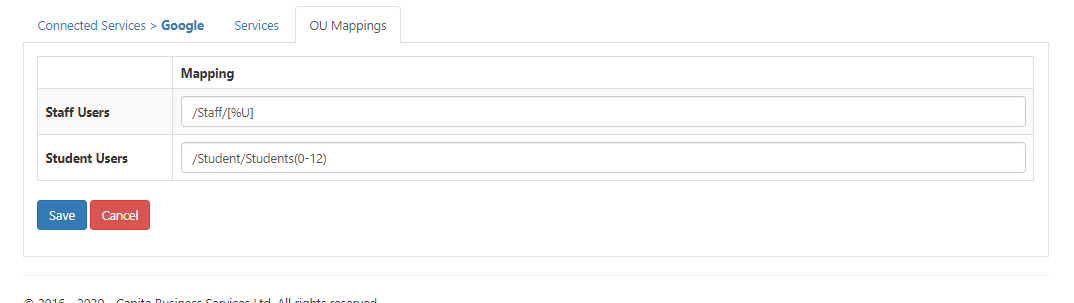
OU Mappings – Provision Staff and Students to a different location within GSuite.
Step 6 - Issue usernames and passwords
Please refer to Regenerating and Distributing Temporary Passwords - updated for dealing with new year groups
Instructions for an existing Google tenancy with existing staff or student user accounts Provisioning & user matching
The method of on-boarding a site that already has users in the Google tenancy follows this process. If you have a blank tenancy you should refer to GREENFIIELD SITE Google Provisioning
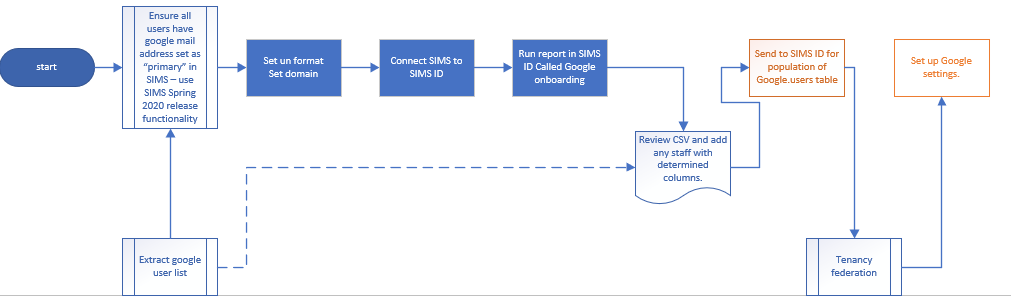
The orange boxes represent steps that can only currently be carried out by SIMS ID staff.
Pre Step 1 - Acquire the Google tenancy
Google process lead by customer
Pre Step 2 - Obtain Username and PW for the site in question
If you do not have a SIMS ID site you can request one from educationsalesadmin@sims.co.uk
A SIMS ID site will be created, and an initial admin account will be provided.
Pre Step 3 Extract users from Google tenancy
Google process lead by customer
Pre Step 4 Import student email addresses into SIMS using the spring 2020 release feature
This sets the primary email address of each pupil with the Google mail address they have. Please see https://youtu.be/zIe22upVF6g for an overview of this feature and the relevant section within the SIMS 7 Handbook for managing pupils/students please see page 201
Staff should also be set but this is manual and is probably done already.
Step 1 Setup SIMS ID perquisites
Log in with credentials at https://id.sims.co.uk
Step 2 Set username formats etc
Please see https://id.sims.co.uk/support/wiki/74/
Step 3 Link SIMS to SIMS ID
Please see https://id.sims.co.uk/support/wiki/73/
Step 4 Run the Google onboarding report
Please use SIMS ID Report Viewer for a report called ‘Google Onboarding’ for help on using report viewer please see https://id.sims.co.uk/support/wiki/40
Step 5 Data review
Review this report and add any missing email addresses in the email column and immutable id column
See below for the required report layout and example data.
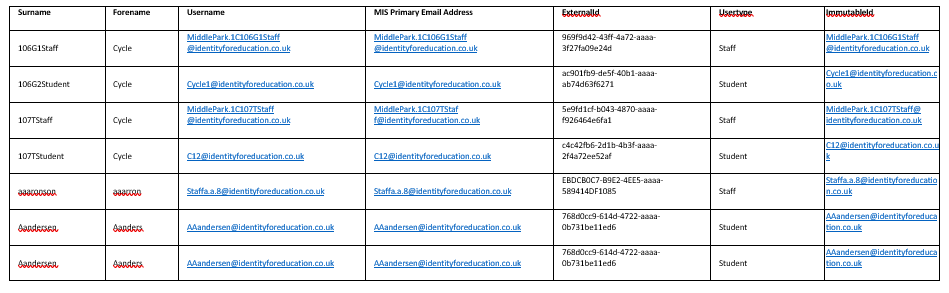
Step 6 Provide CSV to SIMS ID Team
SIMS ID will import this data, eventually, an upload facility will be provided.
Step 7 - Link SIMS ID to Google
Getting started
Like all application installs this task is initiated from inside the Tile Application Store.
For full information on using the Application Tile Store please see Using the Tile Store an Overview
Accessing the Tile Store
Login to SIMS ID https://id.sims.co.uk as a Local Site Administrator,
The Tile Store is accessible via the Tile Store tile on the Launcher Page of SIMS ID. Only admin users will have access to this tile.
If you have admin access to more than one site, when you access the tile store you will be taken to your primary sites Tile store first, if you want to change sites click on the "Change Site" button at the top or the page and a list of available sites will open within the page allowing you to select the site you wish to manage.
Finding the 'Onboard Google' application
A search facility is available on the Tile Store screen to help quickly locate tiles you are looking for. Search for 'Onboard Google'
Checking the application
![image title]/gsob/onboardgoogledetailsbutton.png)
On the Application, there is a Details button. Clicking this button will provide you with information about the application. Included are links to the applications:
- Privacy Statement
- GDPR data transfer summary
Support Page
Installing the Onboard Google Application
To install an application, click on the green Install Button on the tile.
The next screen will inform you that you will agree a GDPR statement later in the process.
Click I agree.
Once installed the Onboard Google application becomes available on the *Available Tiles screen. You will be taken to this screen.
Configuring the Onboard Google application
To configure the application, click on the 'Onboard Google' application tile.
Entering your Google tenancy details
You will be taken to a page where you are able to enter your tenancy details.
The information you need to provide is.
Domain the domain of the school gsuite email eg: schoolname.co.uk
Service Account This is the service you created in the Google Console under credentials eg: schoolnamelinktosimsid@schoolname-link-to-sims-id.iam.gserviceaccount.com
Certificate this is the PK12 certificate you created and downloaded from the google console.
Certificate Password this is the password of the certificate you made a note of when you created the PK12 certificate in the Google Consoled.
Admin Account name this is the SIMS ID Specific account you will have created for SIMS ID to access the tenancy. Please note we have not provided instruction on how to do this)
Application Name This is the application name for the OAuth 2.0 client you created in the Google console. e.g. Client for schoolnamelinktosimsid
You are advised to set Staff, Students and Groups to ON
Step 8 Accounts will provision to Google
Once the tenancy is configured accounts will provision to Google, see below
Step 9 Set SIMS ID Google Preferences
Within SIMS ID > Preferences > Connected Services > Google, the below configurations are available
Auto Provisioning of Users and Groups
You are advised to set Staff, Students and Groups to ON if you did not previously to do so.
G Suite enabled services
OU Mappings – Provision Staff and Students to a different location within GSuite.
Step 10 Issue usernames and passwords
Please see Regenerating and Distributing Temporary Passwords - updated for dealing with new year roups