Linking SIMS ID to Google
Google Onboarding SIMS ID and Google Tenacy Steps
- 1. Instructions for a new Google tenancy with NO current users - Google Provisioning
- 1.1 Pre-Step 1 - Create the Google tenancy
- 1.2 Pre-Step 2 - Obtain Username and PW for the site in question
- 1.3 Step 1 - Setup SIMS ID perquisites
- 1.4 Step 2 - Set username formats etc
- 1.5 Step 3 - Link SIMS to SIMS ID.
- 1.6 Step 4 - Ask SIMS ID to turn on Google
- 1.7 Step 5- Accounts will provision to Google
- 1.8 Step 4b Set SIMS ID Google Preferences
- 1.9 Step 6 - Issue usernames and passwords
- 1.10 OPTIONAL Step 7 - Google Gradesync Pilot
- 2. Instructions for an existing Google tenancy with exisitng staff or student user accounts Provisioning & user matching
- 2.1 Pre Step 1 - Acquire the Google tenancy
- 2.2 Pre Step 2 - Obtain Username and PW for the site in question
- 2.3 Pre Step 3 Extract users from Google tenancy
- 2.4 Pre Step 4 Import into SIMS using the spring 2020 release feature
- 2.5 Step 1 Setup SIMS ID perquisites
- 2.6 Step 2 Set username formats etc
- 2.7 Step 3 Link SIMS to SIMS ID
- 2.8 Step 4 Run the Google onboarding report
- 2.9 Step 5 Data review
- 2.10 Step 6 Provide CSV to SIMS ID Team
- 2.11 Step 7 Ask SIMS ID to turn on Google
- 2.12 Step 8 Accounts will provision to Google
- 2.13 Step 9 Set SIMS ID Google Preferences
- 2.14 Step 10 Issue usernames and passwords
- 2.15 OPTIONAL Step 11 Google Gradesync
- 3. Google Tenancy Steps.
Instructions for a new Google tenancy with NO current users - Google Provisioning
This method of on-boarding is for a site that does not have users in the Google tenancy. If your tenancy has users that you wish to keep please refer to BROWN FIELD SITES Google Provisioning & user matching
Pre-Step 1 - Create the Google tenancy
Google process
Pre-Step 2 - Obtain Username and PW for the site in question
If you do not have a SIMS ID site you can request one from
educationsalesadmin@sims.co.ukeducationsalesadmin@sims.co.ukA SIMS ID site will be created, and an initial admin account will be provided.
Step 1 - Setup SIMS ID perquisites
Log in with credentials at https://id.sims.co.uk
Step 2 - Set username formats etc
Please see https://id.sims.co.uk/support/wiki/74/
Step 3 - Link SIMS to SIMS ID.
Please refer to (https://id.sims.co.uk/support/wiki/73/)
Step 4 - Ask SIMS ID to turn on Google
Provide the following info including the certificate generated for the Google tenancy
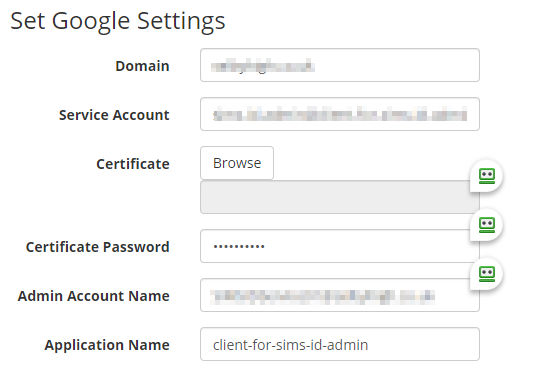
The information you need to provide is.
Domain the domain of the school gsuite email eg: schoolname.co.uk
Service Account This is the service you created in the Google Console under credentials eg: schoolnamelinktosimsid@schoolname-link-to-sims-id.iam.gserviceaccount.com
Certificate this is the PK12 certificate you created and downladed from the google console.
Certificate Password this is the password of the certificate you made a note of when you created the PK12 certificate in the Google Consoled.
Admin Account name this is the SIMS ID Specific account you will have created for SIMS ID to access the tenancy. Please note we have not provided instruction on how to do this)
Application Name This is the application name for the OAuth 2.0 client you created in the Google console. e.g. Client for schoolnamelinktosimsid
Step 5- Accounts will provision to Google
Once the tenancy is configured accounts will now provision to Google
Step 4b Set SIMS ID Google Preferences
Within SIMS ID > Preferences > Connected Services > Google, the below configurations are available
Auto Provisioning of Users and Groups
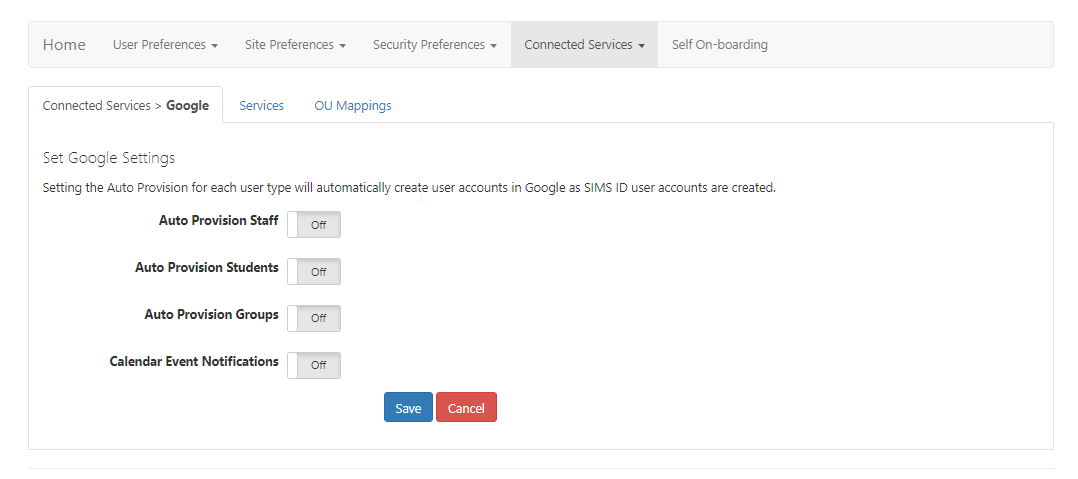
You are advised to set Staff, Students and Groups to ON
G Suite enabled services

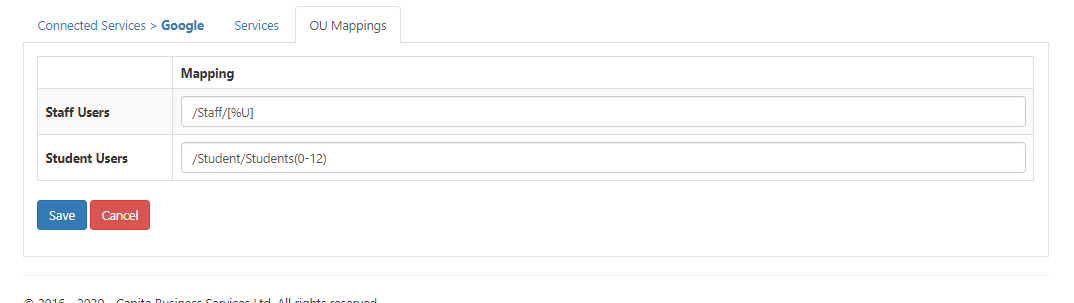
OU Mappings – Provision Staff and Students to a different location within GSuite.
Step 6 - Issue usernames and passwords
Please refer to Regenerating and Distributing Temporary Passwords - updated for dealing with new year groups
OPTIONAL Step 7 - Google Gradesync Pilot
Using Google Grades Write back to SIMS Assessment Manager
Google is hosting a pilot to transfer data from Google Classroom Gradebook to SIMS Assessment Manager.
To find out more and to learn to set up this feature please see Google Classroom Gradesync Pilot and the associated Google Grades Teacher Guide
Instructions for an existing Google tenancy with exisitng staff or student user accounts Provisioning & user matching
The method of on-boarding a site that already has users in the Google tenancy follows this process. If you have a blank tenancy you should refer to GREENFIIELD SITE Google Provisioning
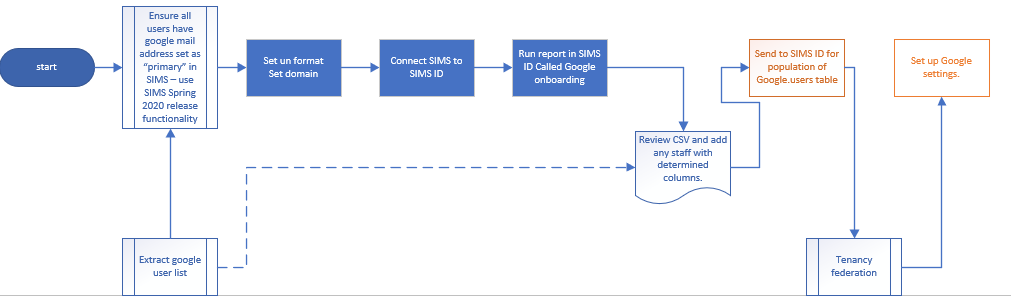
The orange boxes represent steps that can only currently be carried out by SIMS ID staff.
Pre Step 1 - Acquire the Google tenancy
Google process lead by customer
Pre Step 2 - Obtain Username and PW for the site in question
If you do not have a SIMS ID site you can request one from
educationsalesadmin@sims.co.ukeducationsalesadmin@sims.co.ukA SIMS ID site will be created, and an initial admin account will be provided.
Pre Step 3 Extract users from Google tenancy
Google process lead by customer
Pre Step 4 Import into SIMS using the spring 2020 release feature
This sets the primary email address of each pupil with the Google mail address they have. Please see https://youtu.be/zIe22upVF6g for an overview of this feature.
Staff should also be set but this is manual and is probably done already.
Step 1 Setup SIMS ID perquisites
Log in with credentials at https://id.sims.co.uk
Step 2 Set username formats etc
Please see https://id.sims.co.uk/support/wiki/74/
Step 3 Link SIMS to SIMS ID
Please see https://id.sims.co.uk/support/wiki/73/
Step 4 Run the Google onboarding report
Please use SIMS ID Report Viewer for a report called ‘Google Onboarding’ for help on using report viewer please see https://id.sims.co.uk/support/wiki/40
Step 5 Data review
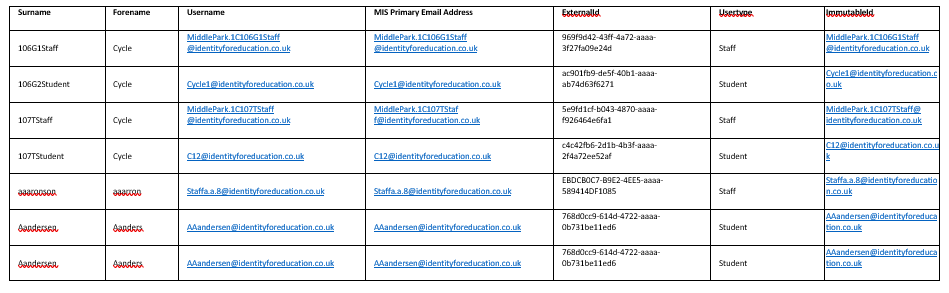
Review this report and add any missing email addresses in the email column and immutable id column
See below for the required report layout and example data.
Step 6 Provide CSV to SIMS ID Team
SIMS ID will import this data, eventually, an upload facility will be provided.
Step 7 Ask SIMS ID to turn on Google
Provide the following info including the certificate generated for the Google tenancy
Refer to Google Tenancy Steps. for details on creating the accounts and keys (aka certificate)
We are working on making this screen available to Local Site Administrators to allow full self-onboarding.
Step 8 Accounts will provision to Google
Once the tenancy is configured accounts will provision to Google, see below
Step 9 Set SIMS ID Google Preferences
Within SIMS ID > Preferences > Connected Services > Google, the below configurations are available
Auto Provisioning of Users and Groups
You are advised to set Staff, Students and Groups to ON
G Suite enabled services
OU Mappings – Provision Staff and Students to a different location within GSuite.

Step 10 Issue usernames and passwords
Please see Regenerating and Distributing Temporary Passwords - updated for dealing with new year roups
OPTIONAL Step 11 Google Gradesync
Using Google Grades Write back to SIMS Assessment Manager
Google are hosting a pilot to transfer data from Google Classroom Gradebook to SIMS Assessment Manager.
To find out more and to learn to set up this feature please see Google Classroom Gradesync Pilot and the associated Google Grades Teacher Guide
Google Tenancy Steps.
Setting up the API link for provisioning
Log into the tenancy at console.developers.google.com using a tenancy admin user account.
Creating an API project
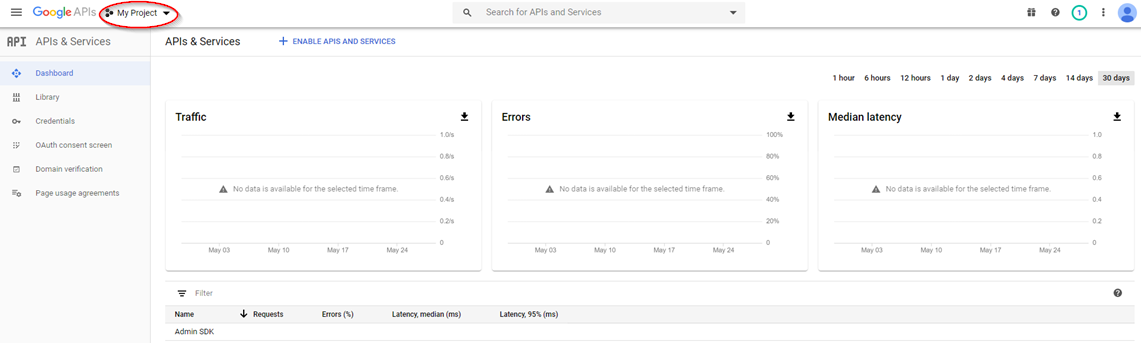
Click on My Project next to the Google API logo.
The following dialogue will open

Click on New Project in the top right of this dialogue.
A project creation page will load
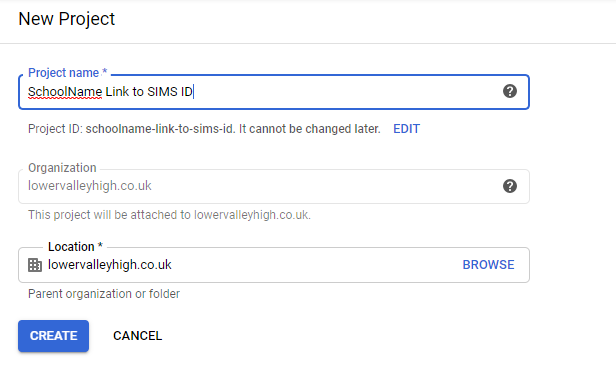
Call the project SCHOOLNAME link to SIMS ID The location should be your tenancy
Configure the API Project
On the console screen
Click on My Project next to the Google API logo.
This will open a diague.
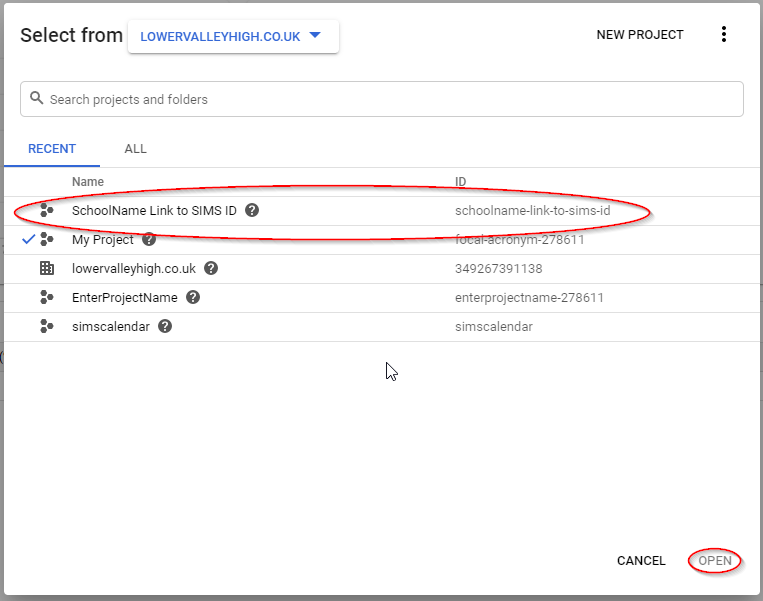
Click on the name of your project (SCHOOLNAME link to SIMS ID) then click Open
Adding API Services for Admin SKD and Calendar API
The following screen will display
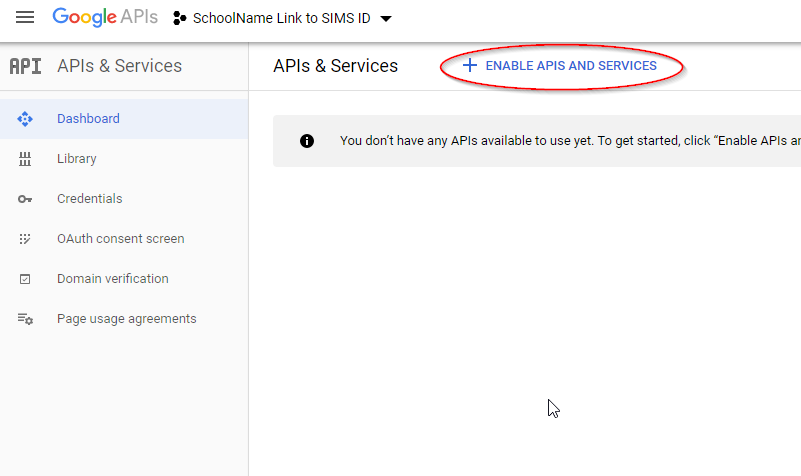
Please click on Enable APIS and Services
This will open the API Library

In the box search type Admin
This will return a number of APIs please find Admin SDK and click on it.
This will present a screen for the admin SDK.
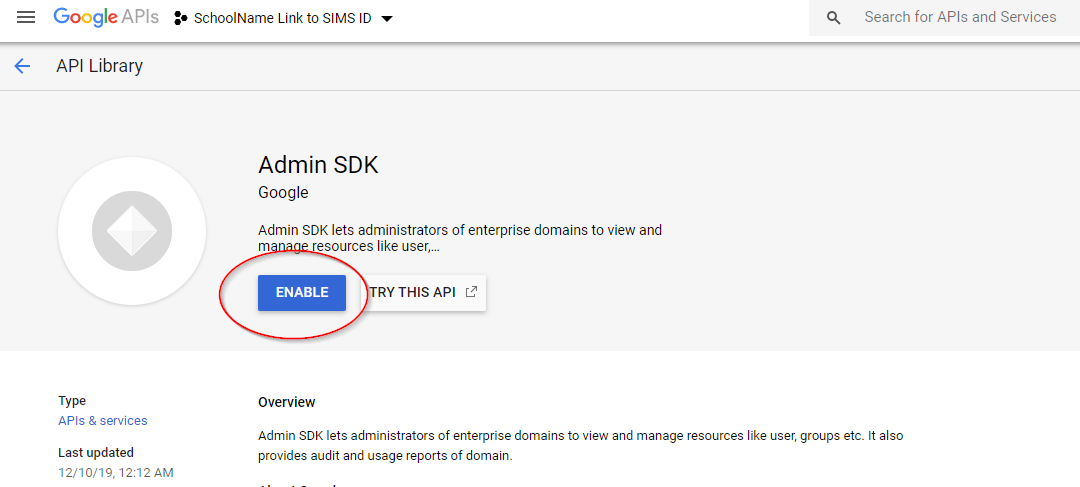
Please click ENABLE
Then click the back arrow next the words API library (top left) to return to the API Library.
This will return you to the API Library.
In the search box please search for Calendar

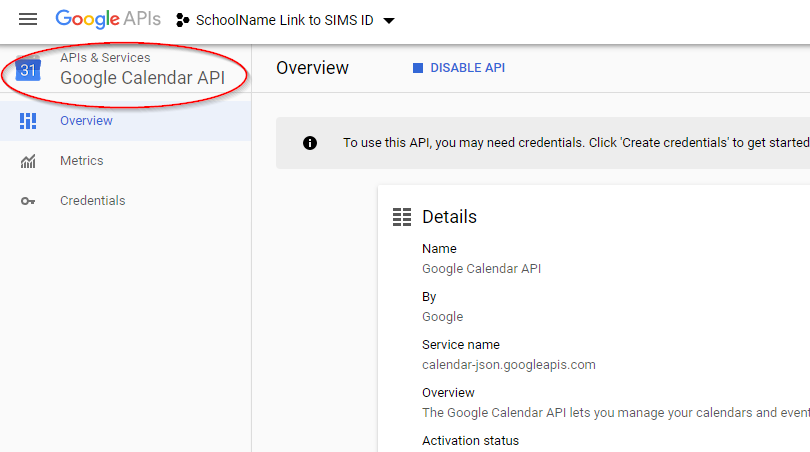
This will return a number of results please find Google Calendar API and click on it
This will present a screen for that API please click Enable You will be returned to this screen
Please click on APIs and Serivce to return to the main console.
###Creating a service account
From the console
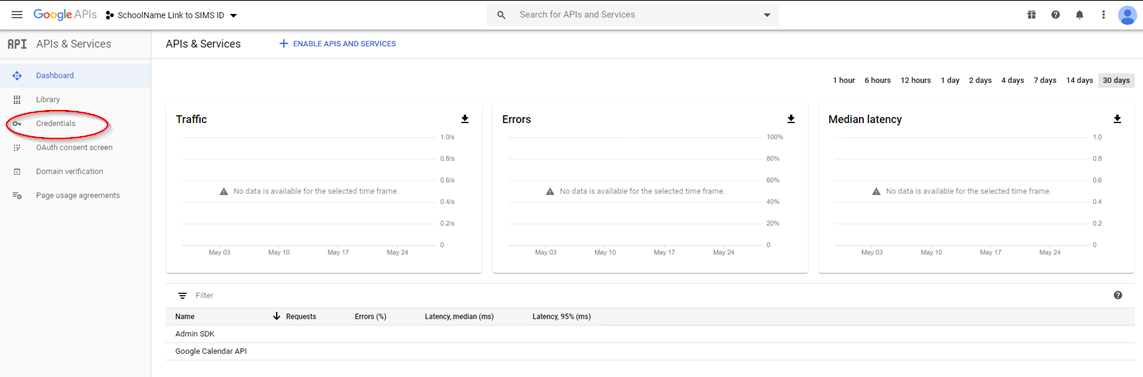
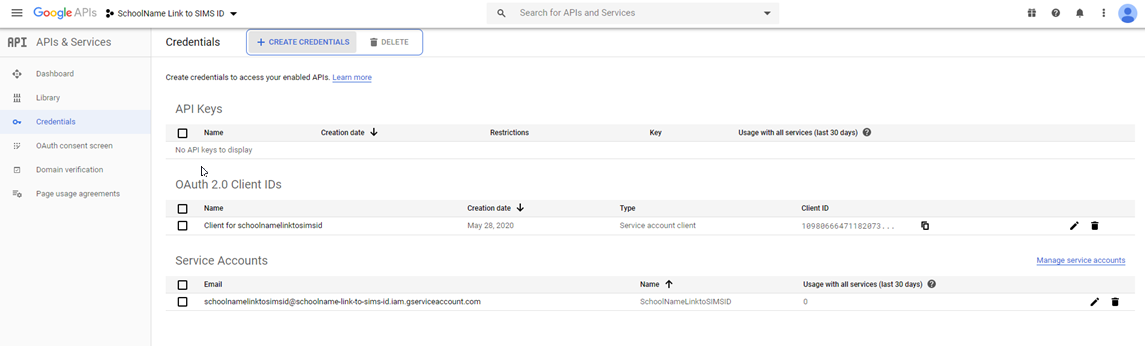
Click on credentials in the left had navigation.
This will take you to the credentials screen

Click +CREATE CREDENTIALS and Service Account
This will take you to a page where you can create a Service Account.
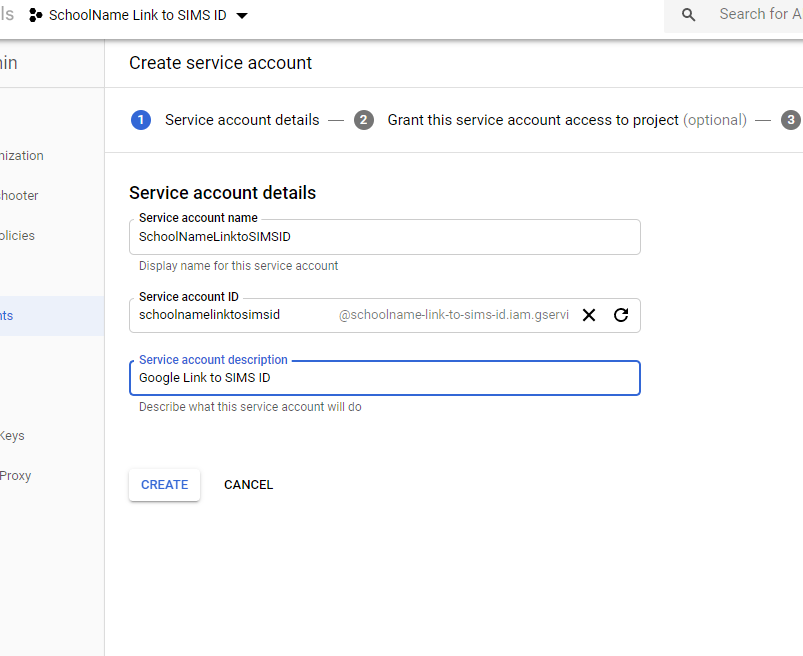
The Service Account Name should be set to SchoolNameLinktoSIMSID and the description to Google link to SIMS ID
Click Create
Assinging Service Account Permissions
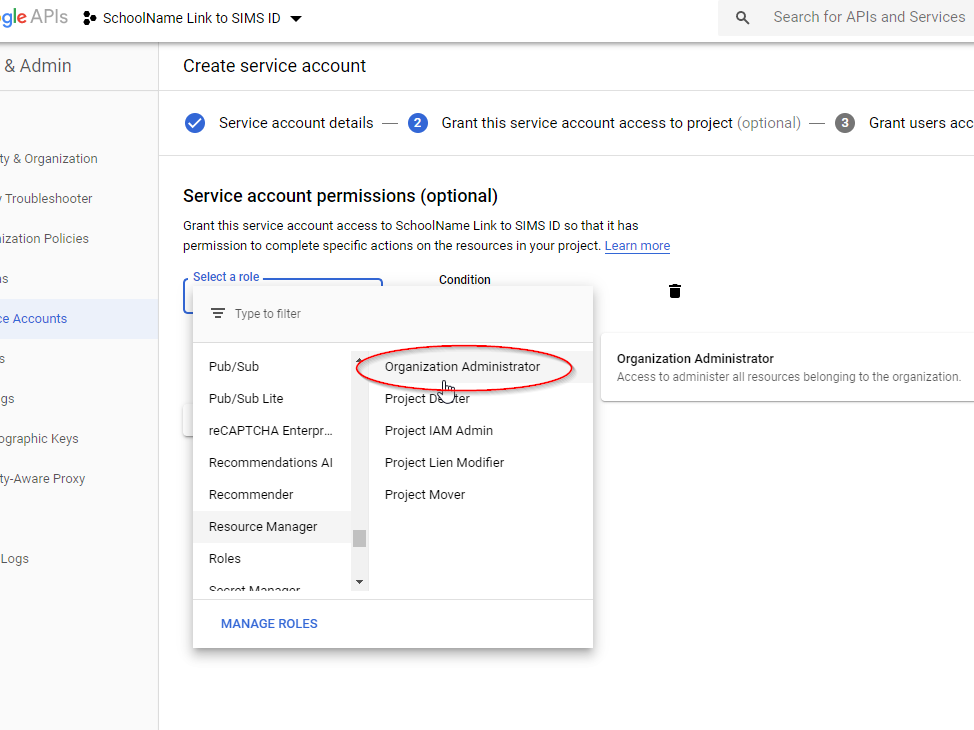
When the service account is created you can assing permissions to it Ib the Select a Role drop choose Resource Manager and Organization Administrator
Then click Continue
Creating a Key
You will now be taken to a page where you can create a key
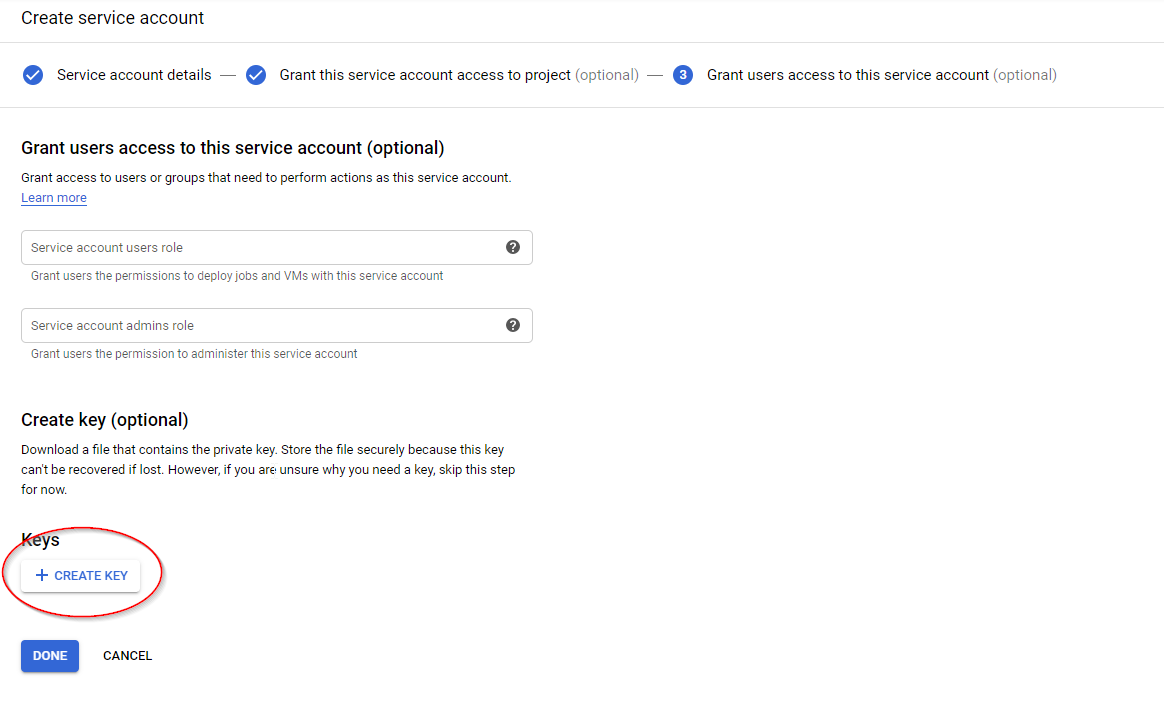
Towards the bottom of the page click **+Create Key)
A dialogue will open
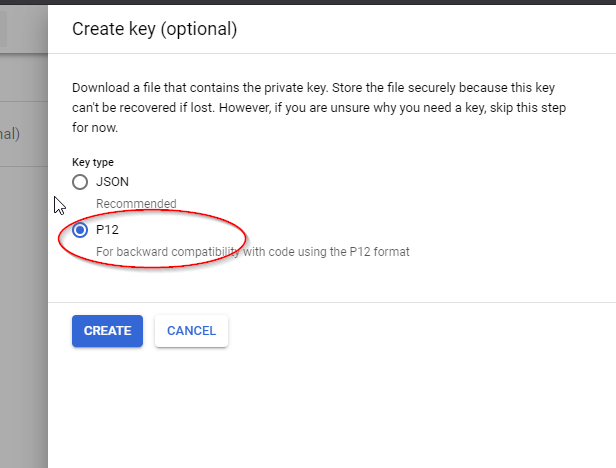
Ensure P12 is selected and click Create
A dialogue will open displaying the certificate password and the certificate will download to your local maching (probably to your downloads folder)
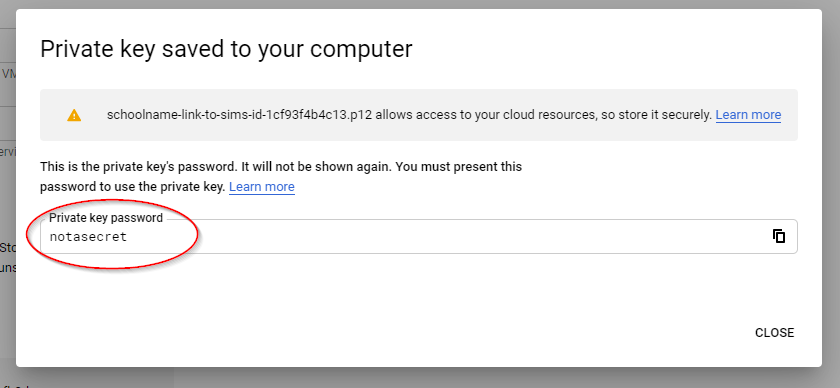
@@warniningbox:make a note of the password it will not be displayed again@@
Now click Done
Enabling the OAuth 2.0 client
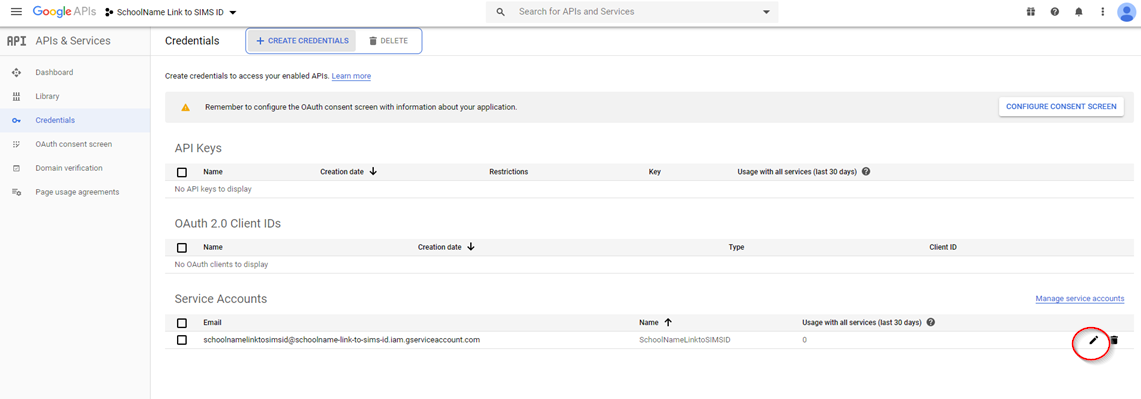
From the console screen click the Pencil Icon next to the service account you have just created**
On the Service account details page
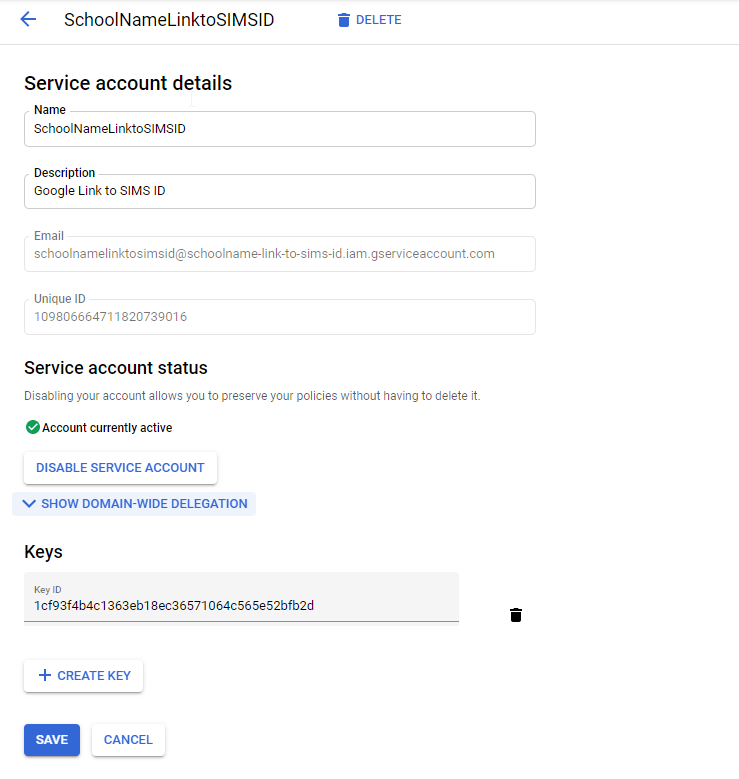
Click on the SHOW DOMAINWIDE DELEGATION link to display the configuration options
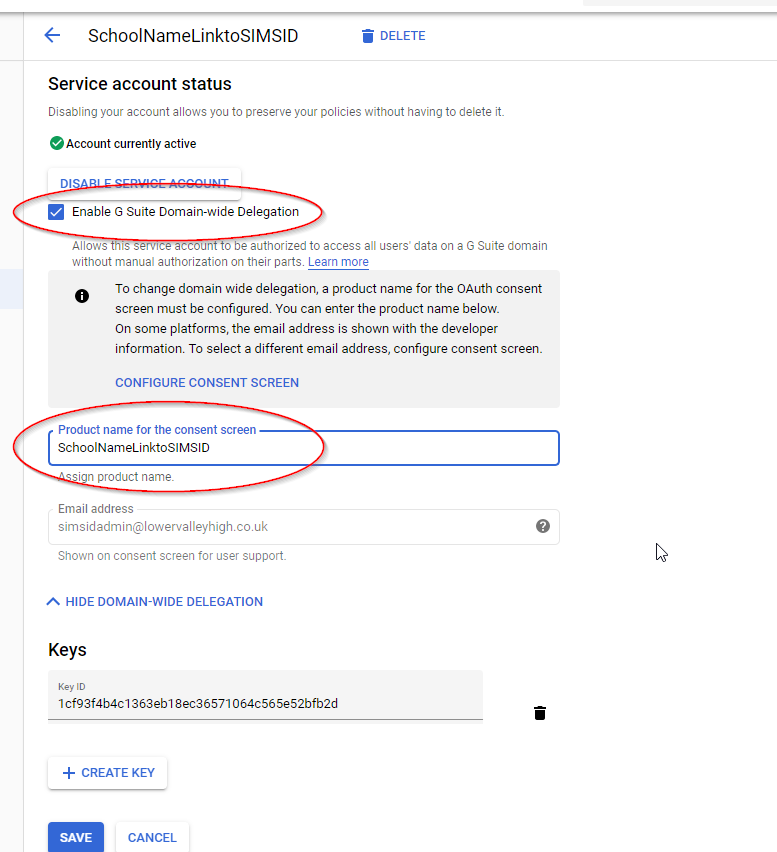
Tick Enable G Suite Domain-wide Delegation
Enter a Product Name for the consent screen enter this as SchoolnameLinktoSIMSID
Then click SAVE
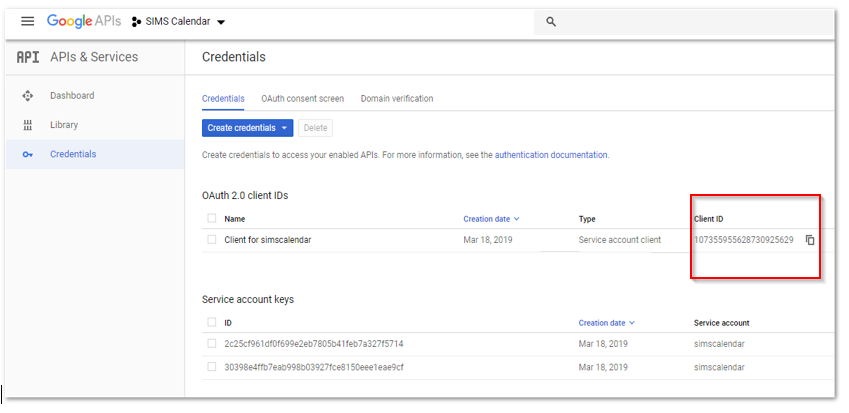
You will be returned to the console credentails homepage
Setting domain wide delegation permissions
Note the client ID, as highlighted
Navigate to https://admin.google.com * Security * API Controls * Domain-wide delegation * Click on Manage Domain-wide delegation
Click Add new Enter Client ID (from above) Enter the one / all of the following in OAuth Scopes based on integration required.
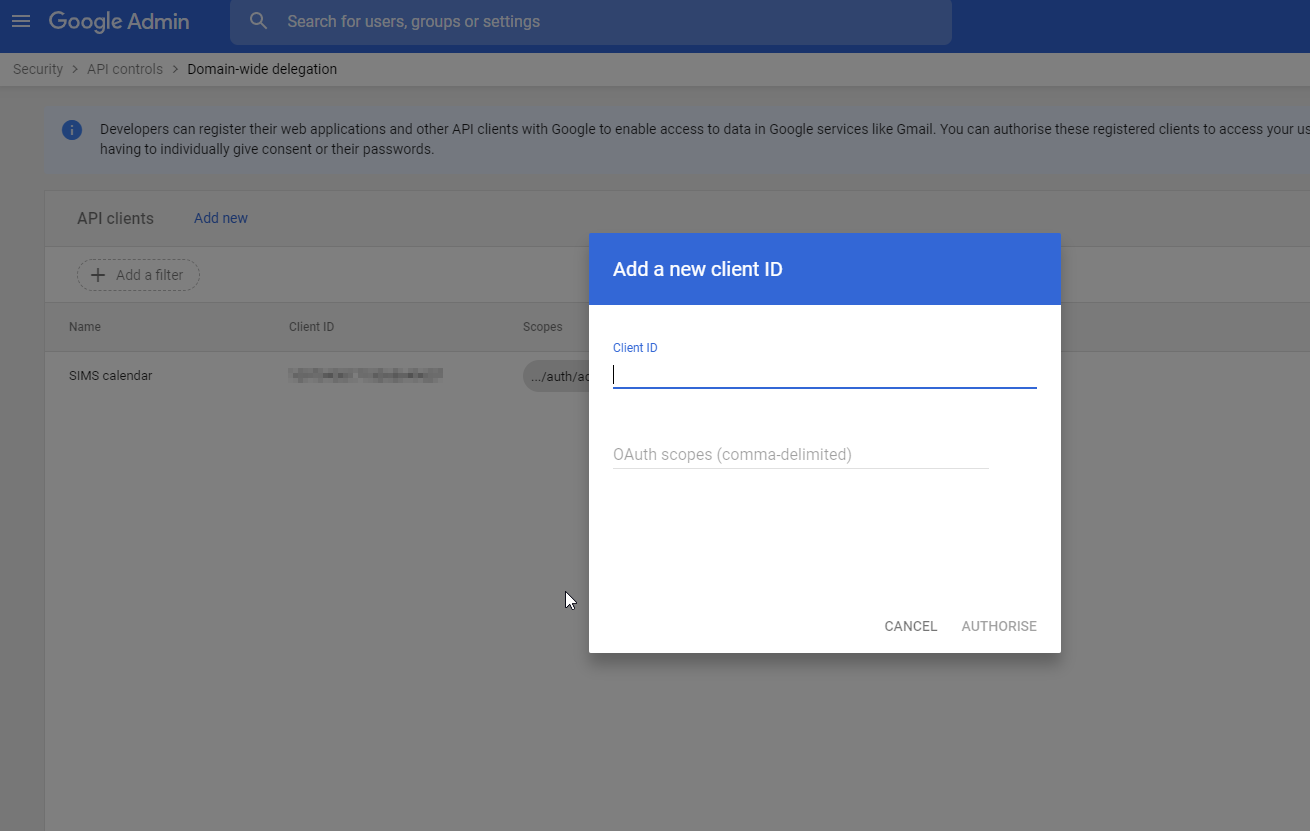
User / Group Provisioning
- https://www.googleapis.com/auth/admin.directory.group
- https://www.googleapis.com/auth/admin.directory.group.member
- https://www.googleapis.com/auth/admin.directory.user
- https://www.googleapis.com/auth/drive (if required)
SIMS Timetable to Google Calendar
- https://www.googleapis.com/auth/calendar
When you have added all the required scopes please click Authorise
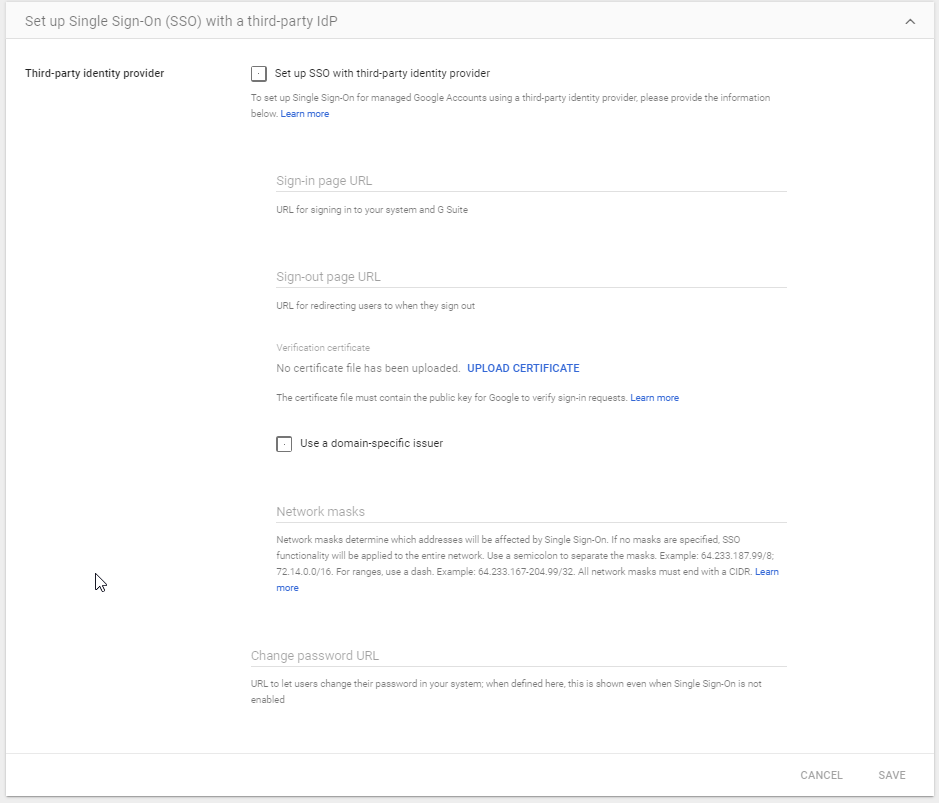
Setting up single sign-on (SSO) with SIMS ID
Navigate to https://admin.google.com
- Security
- Setup single sign-on (sso) with a third party idp
Enter the below fields;
Sign-in page URL - https://sso.sims.co.uk/saml/google/emaildomain
email domain is school domain without the full stops i.e. greenabbey.capita.sch.uk - greenabbeycapitaschuk
Sign-out page url - https://sso.sims.co.uk/saml/sloservice
request certificate to be uploaded from capitasoftwaresupport@capita.co.uk
Tick - Use a domain-specific user
Change password url - https://id.sims.co.uk
Click Save
This
@@infobox:This completes the SIMS ID / Google Integration please now go to